We're sharing our experience working through our DIY under-the-stairs coat closet pantry conversion! Our underused closet is now so useful!
Let's start with the reason behind this project. We have a pantry with sliding doors set into one wall of our kitchen, and we're grateful to have it. In our last house, we had no such storage area in the kitchen, so we turned a bookshelf in the garage into a pantry. Now, some seven-odd years later, we've completely filled this little kitchen pantry to overflowing, and we're back to storing stuff in the hutch in the dining room, in the garage, in the coat closet downstairs...you name it.
Some of that's because our family has grown, of course (there are seven of us now!), so there's just more food and ingredients to store, and some of it's due to the proliferation of kitchen gadgets you accumulate when you (a) seek to make most of your food at home from scratch, and (b) run a food blog. Unfortunately, we don't live in one of those McMansions (or real mansions!) with a butler's pantry, which sounds dreamy, I'm admit, even sans butler (heck, I'll be the butler).
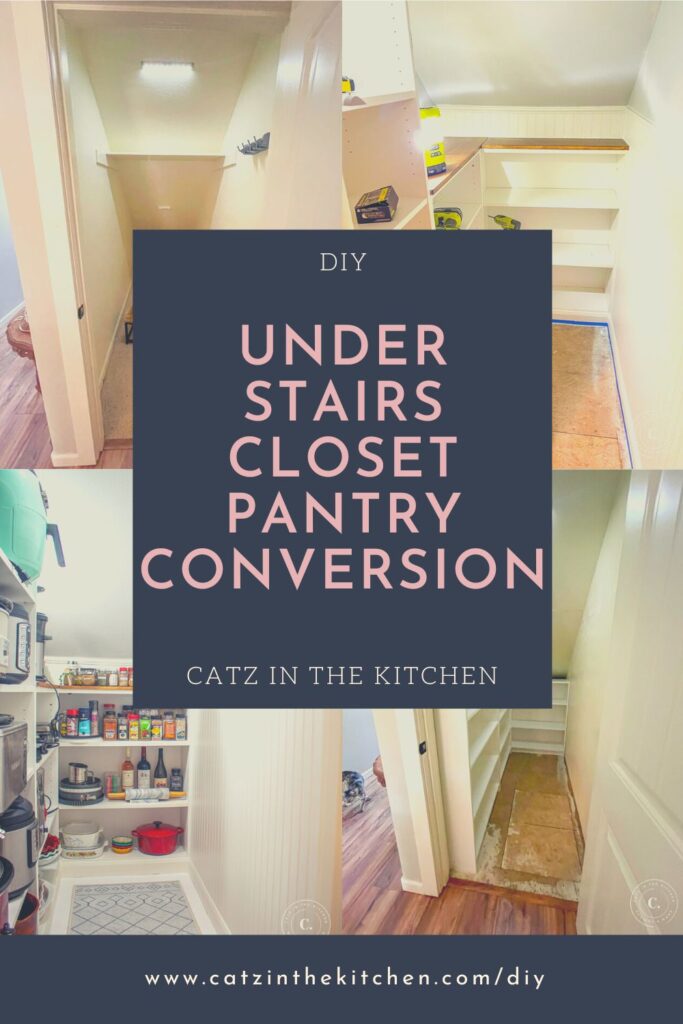
So, how to solve this problem? Well, we started organizing shelves and racks in the garage again, which is a fine solution if that's the only option you've got. However, like many people, I suspect, we have an underutilized (well, previously underutilized) coat closet underneath our stairs. The declining ceiling in such a closet makes it challenging to properly utilize the space - in our case, the coats hung in front, of course...but what was behind? At one point, Eden had a little hide out back there, complete with curtains and a reading light, which was cute, but really just a short-lived novelty. It inevitably became a catch all for stuff we didn't know what to do with...and because you can't really see it or get to it (other than through the coats a la Narnia), it ends up being a mess of odds and ends and no one really knows what is there anyway...
Then one day I stumbled upon this Instagram reel from Shanty2Chic. I knew immediately this was what I wanted to do with that closet. We had another coat closet in the bedroom downstairs and a coat hanger in the hallway, so the coats could happily live elsewhere. But to create a walk-in pantry out of essentially nowhere...? Brilliant! Chels required very little selling on the idea, as you can imagine.
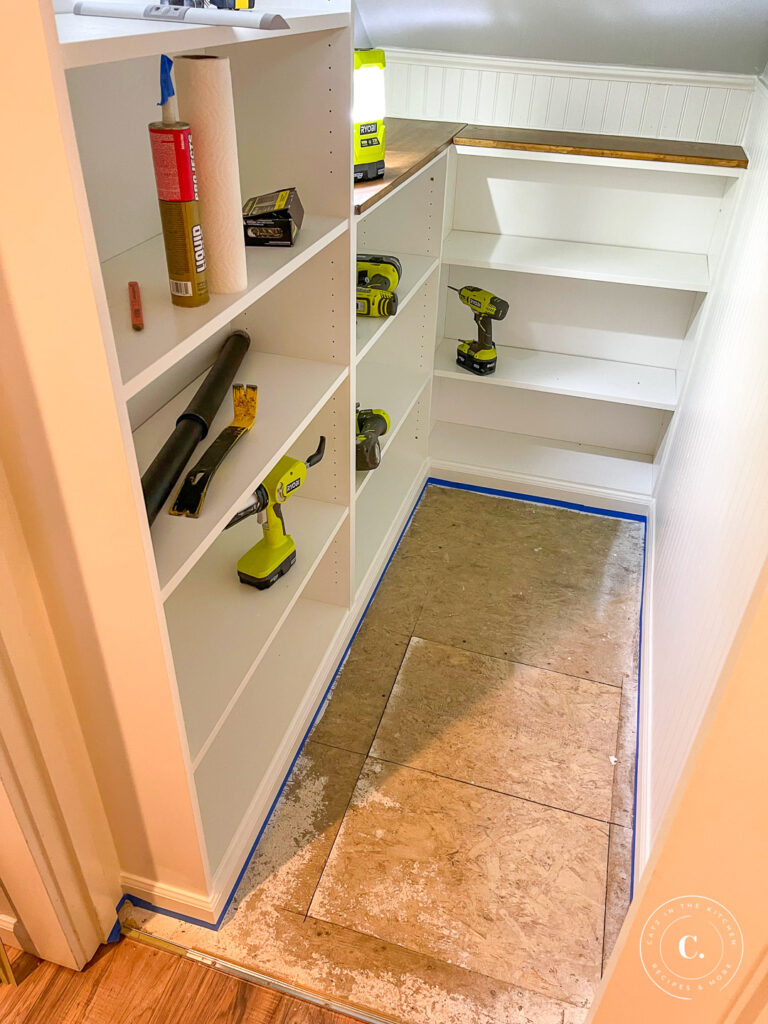
Here is the aforementioned under the stairs coat closet. I had already pulled out the rod when I took this picture, but you get the idea. Narrow, fairly deep, with that declining ceiling that reflects the stairs above. Ours also has carpet (as I mention fairly often in these DIY posts, I'm not a fan of carpet), as well as the trapdoor to the crawlspace.
Before we go any further, I’ll give you my standard disclaimer about my own DIY abilities and the purpose of this post. First, I’m an amateur! That will be obvious as we go forward, I’m sure! My goal here is not to instruct you on every aspect of how to execute a similar project, but merely to share my experiences, what seemed to work well and what didn’t, what resources I found helpful, what I would do differently, and so on, in an effort to make your experience better and easier should you embark on a project of your own! Naturally, any DIY project you take is always at your own risk – you know the drill (no pun intended). Always check local codes and regulations before beginning any project like this, as applicable.
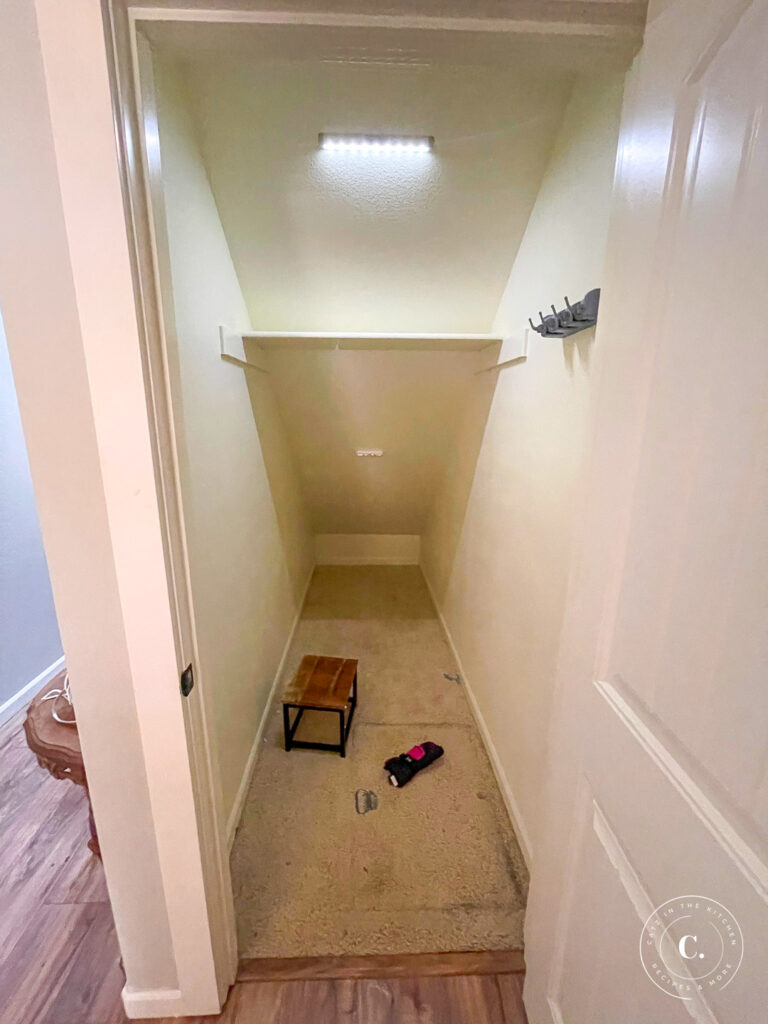
The first step, of course, was to pull off the baseboard moulding and tear out the carpet, along with the little shelf that had been mounted above the coat rod. Simple enough to do, but in a small space like this, it takes a lot of extra time due to the plethora of fasteners in use! Staples all around the edges, staples where the pads come together, stapes around the edges of the trapdoor (both outside and inside!). Lots and lots of staples. I'll also note that I take some extra care removing the baseboard so that I can reuse most of it - a few extra minutes to score the caulking with a box cutter and carefully pry it away with a paint scraper is time well spent.
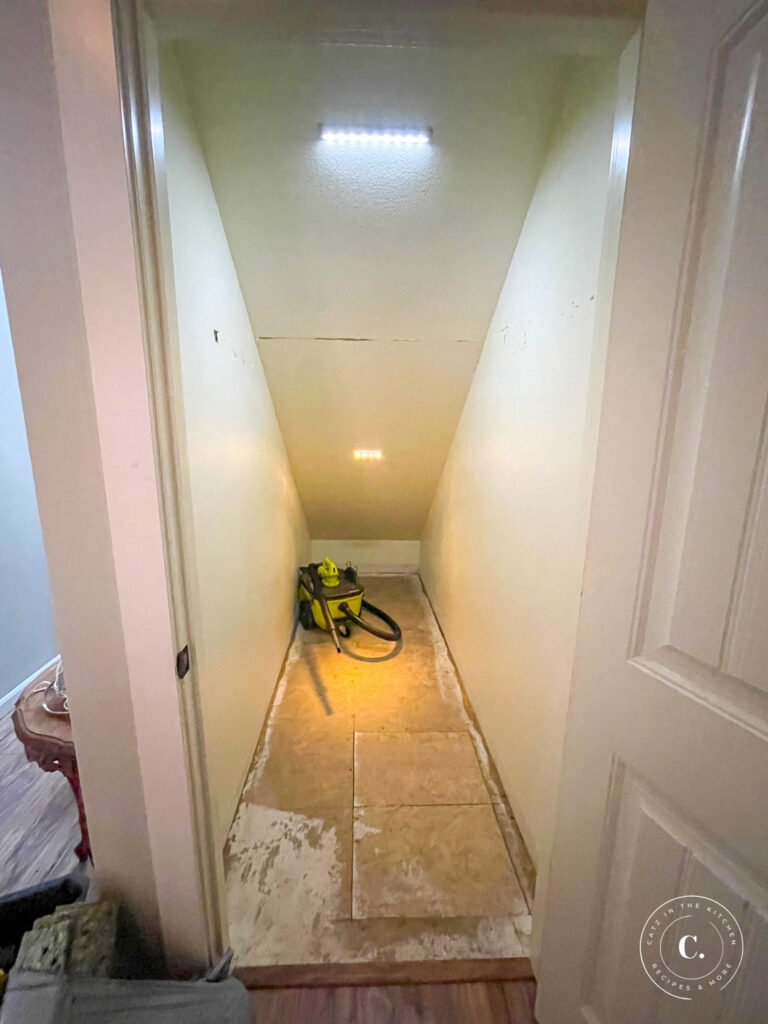
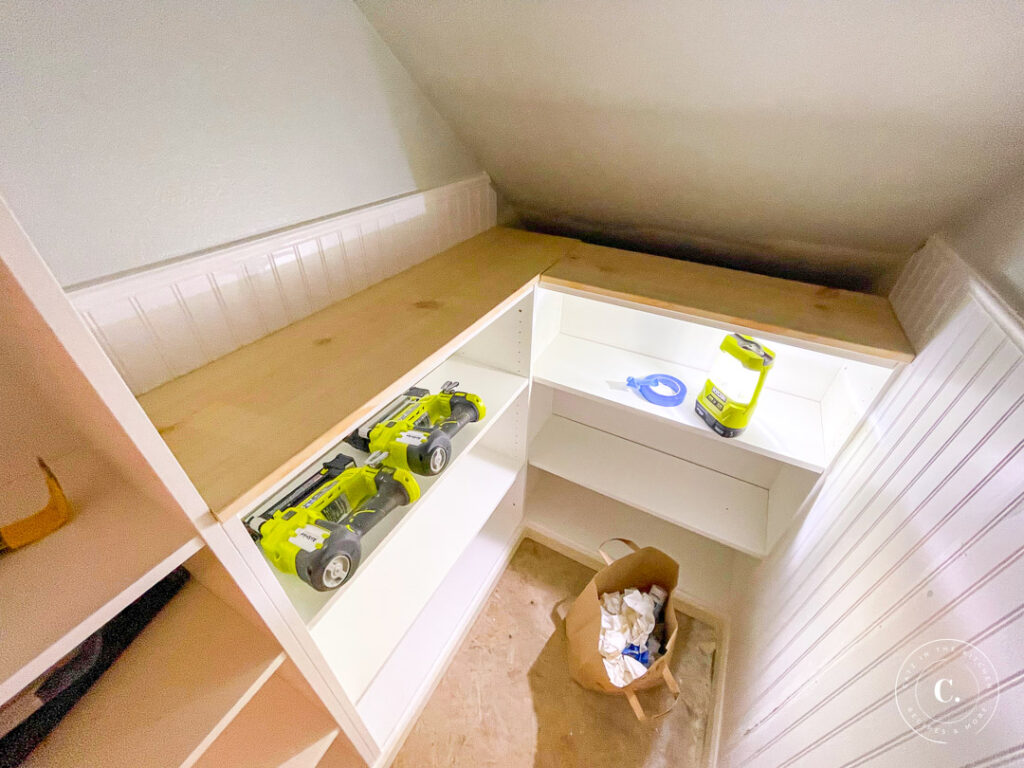
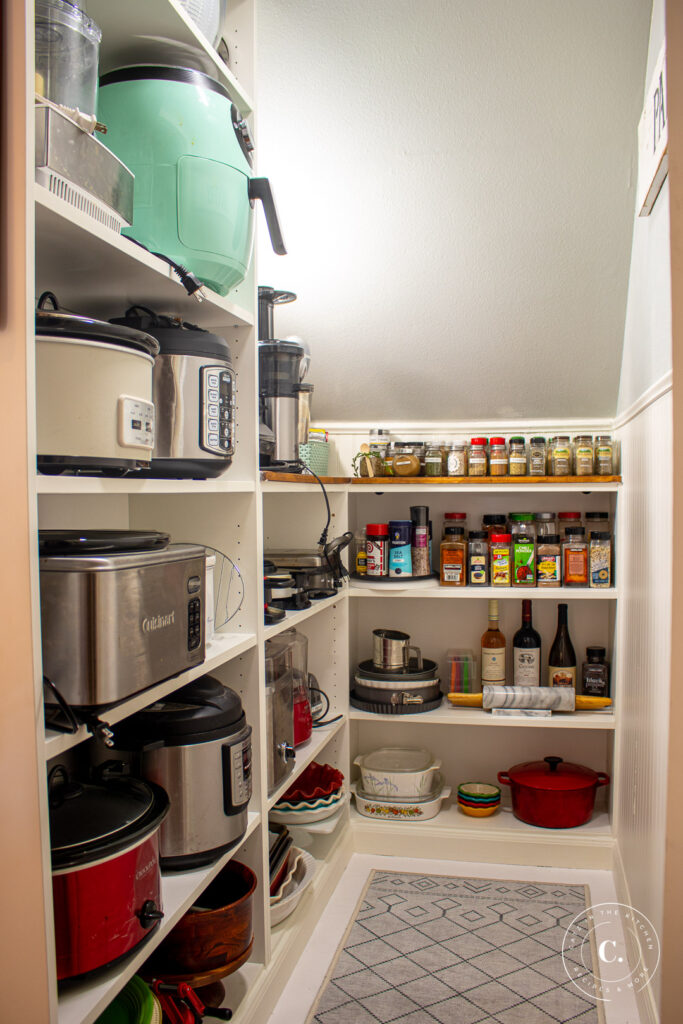
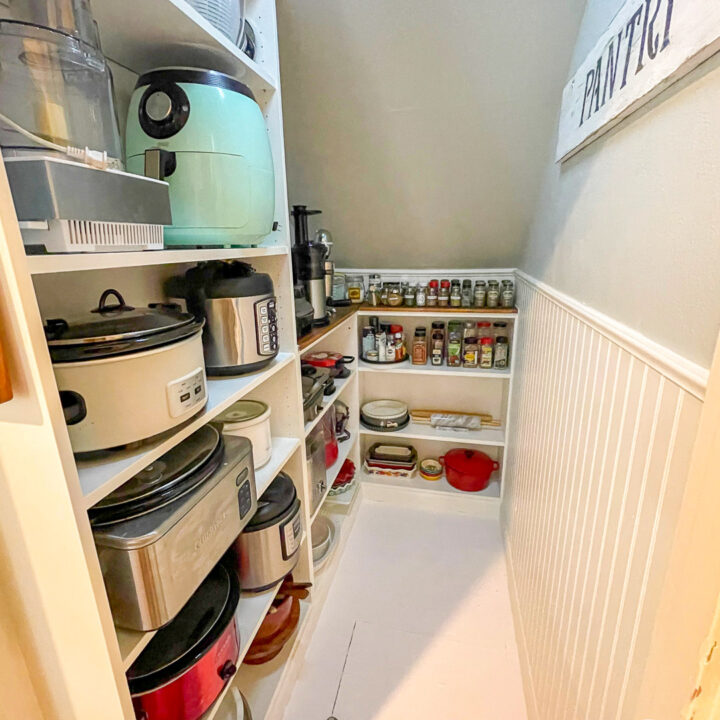
Now, I have built my own shelves and cabinets before, but that is a ton of work, and just not really necessary for this space. The idea of "building in" IKEA shelving units of various sizes just made too much sense. So I measured carefully, length, depth, width, and especially the angle of that declining ceiling, and then perused IKEA's website to try to determine the correct combination of Billy bookcases to make the most of the space. The ones we bought came to a total of $190 (I'll admit it - with lumber prices where they are, I could never had built them for this price). One of the 31.5 inch wide by 79.5 inch high units for the tall space closest to the door, and two of the 31.5 inch wide by 41.75 inch tall units for the deeper side and rear.
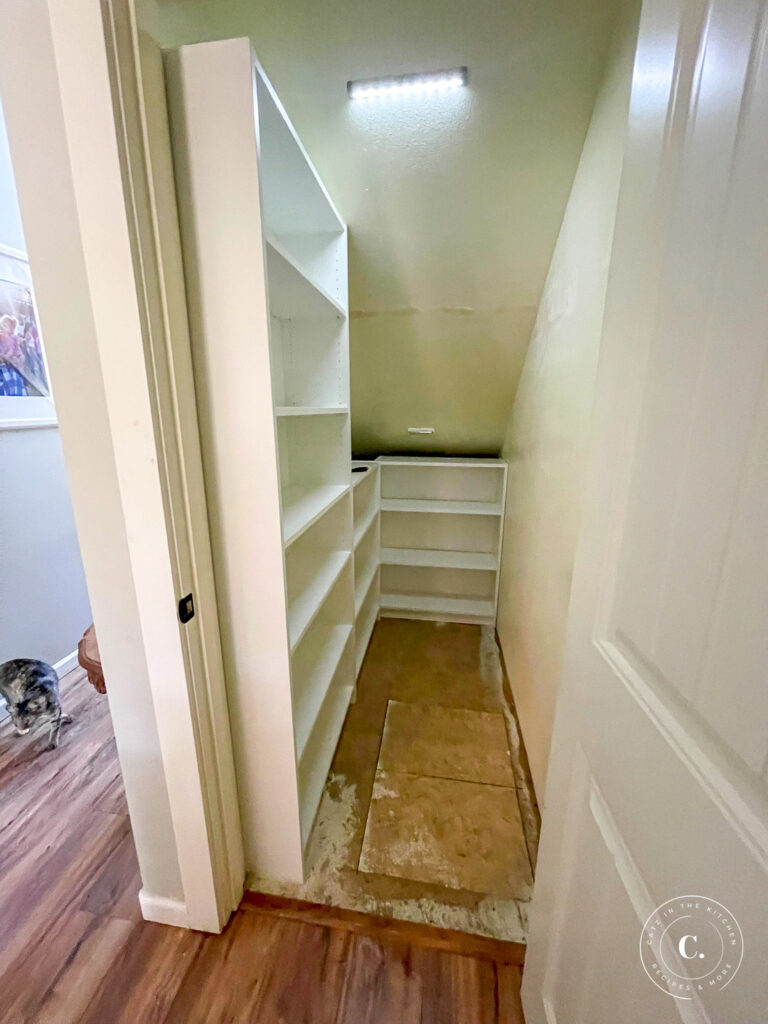
As you can see from the photos, situating the units in this L-shape cuts off the very back of the closet, but I don't really consider that a loss, as the space is just too small and triangular to utilize in any meaningful way. Once I had the three units situated exactly the way I wanted them, I used wood screws (2.5 inch) to fasten them in place, drilling through the sides into studs in the wall, and then using shorter (1.25 inch) wood screws to secure them to each other. The result was very firm - no wobbling.
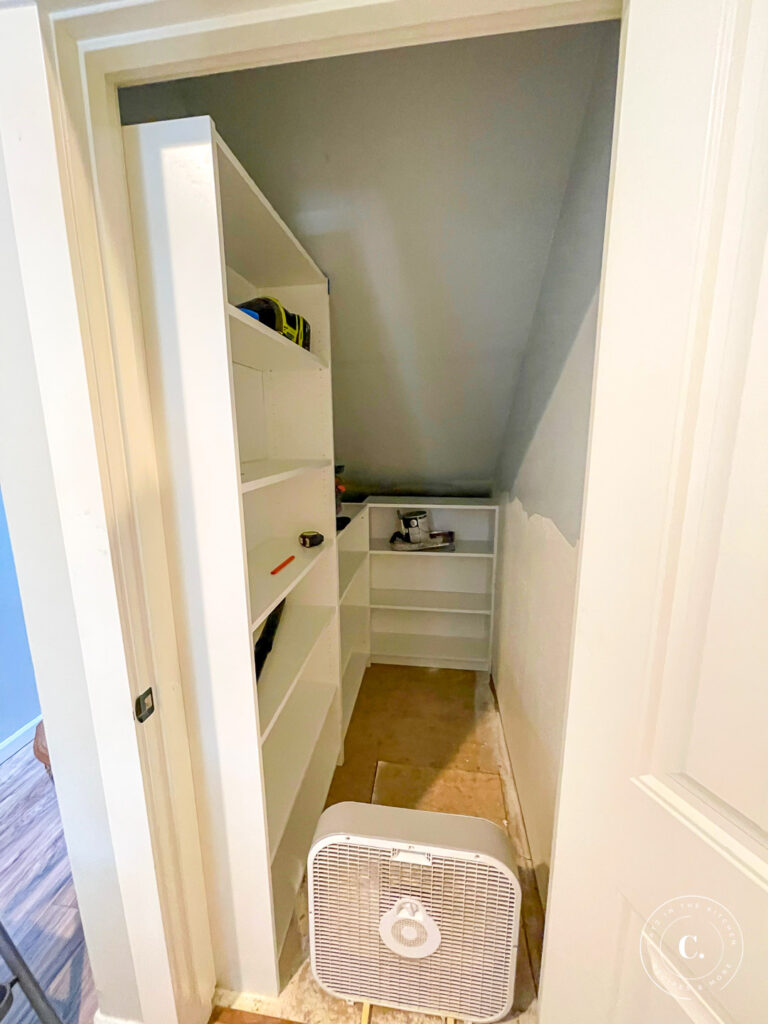
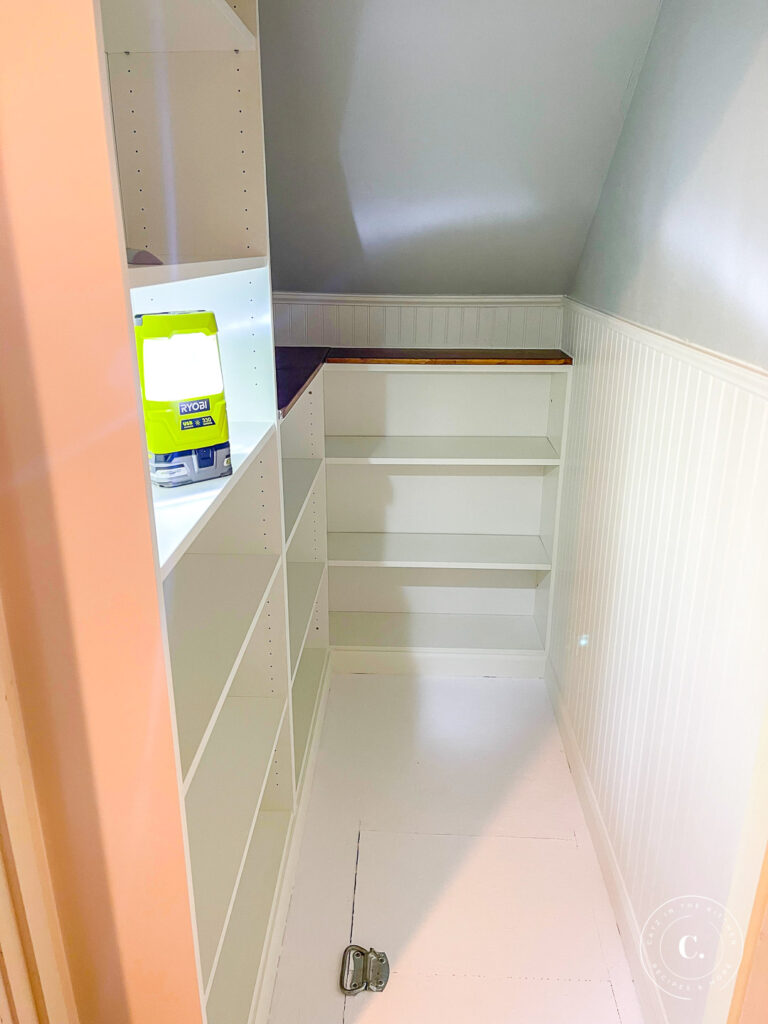
We decided we wanted to add a little accent by covering the righthand wall up to four feet in height with wainscoting (beadboard), which would extend around the back and lefthand side just for the little exposed portion of the wall above the short units (roughly six inches high). That meant painting the portion of the wall and ceiling that was exposed above that four foot height mark. Chels loves Sherwin-Williams' Silver Strand, which we've used in two of our bathrooms, so we decided to use that again here. It's pleasant, mostly neutral, and (hopefully) pretty timeless.
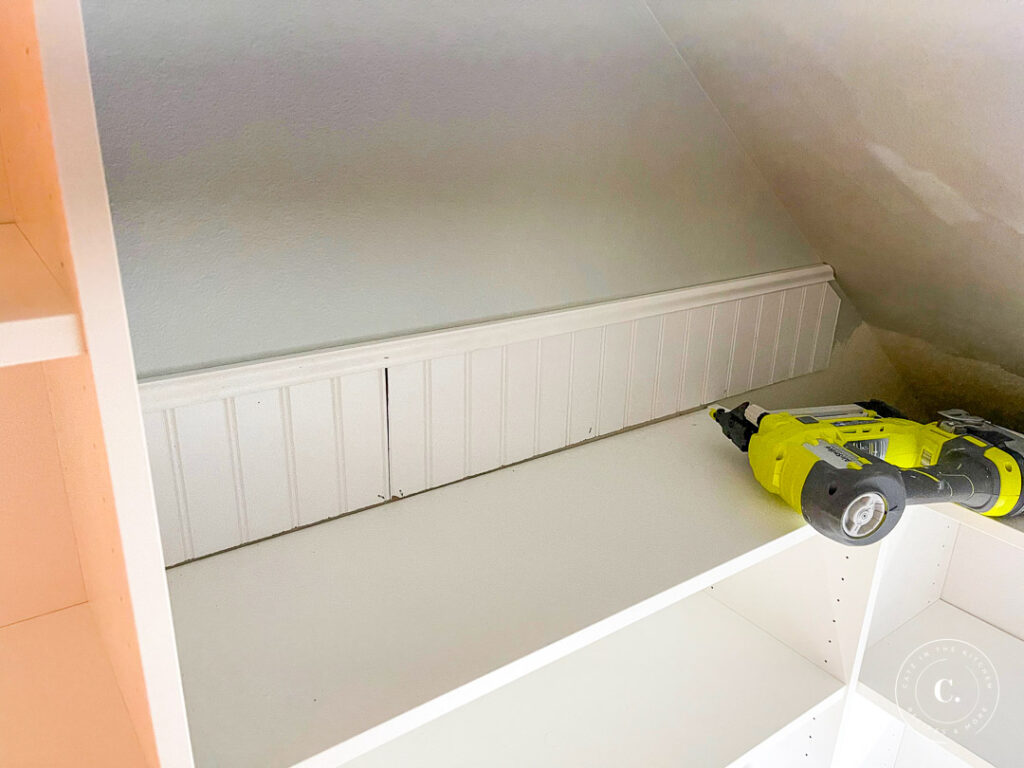
I'll be honest - getting the beadboard into this little six inch high space around the tops of the shelves was WAY more challenging than I expected. The space was just so small, and for the forward-facing shelving unit, backed up to nothing (because of the declining ceiling), which didn't make things any easier! For this one, I waited until the countertops were in (see below), as it changed the height of the beadboard panel. I tacked it in as well as I could, but there was a lot of spackling and caulking needed to get this trim looking up to snuff!

I was using leftover beadboard from a previous project here (Cadáin's nursery, I think), and one piece had been dropped at one point, resulting in a dog-eared edge. I was determined to make it work, however, and once everything was caulked and painted, it was barely noticeable. I wouldn't have installed it in a wide-open space, like a bedroom or bathroom, but here in the pantry/closet, it's totally fine.
I shared a lot of tips I learned my first time installing this beadboard in our DIY Nursery Makeover post (for Ruby's nursery, back in 2017!), and while most of that holds true, there is one caveat I would add today. If you have a narrow crown stapler at your disposal, that is a much easier way to get this stuff to hang straight. It requires being a bit more strategic in your placement and a tad more work in touchup when you're done, but well worth it for straight, tight, strong beadboard panel placement in my opinion.
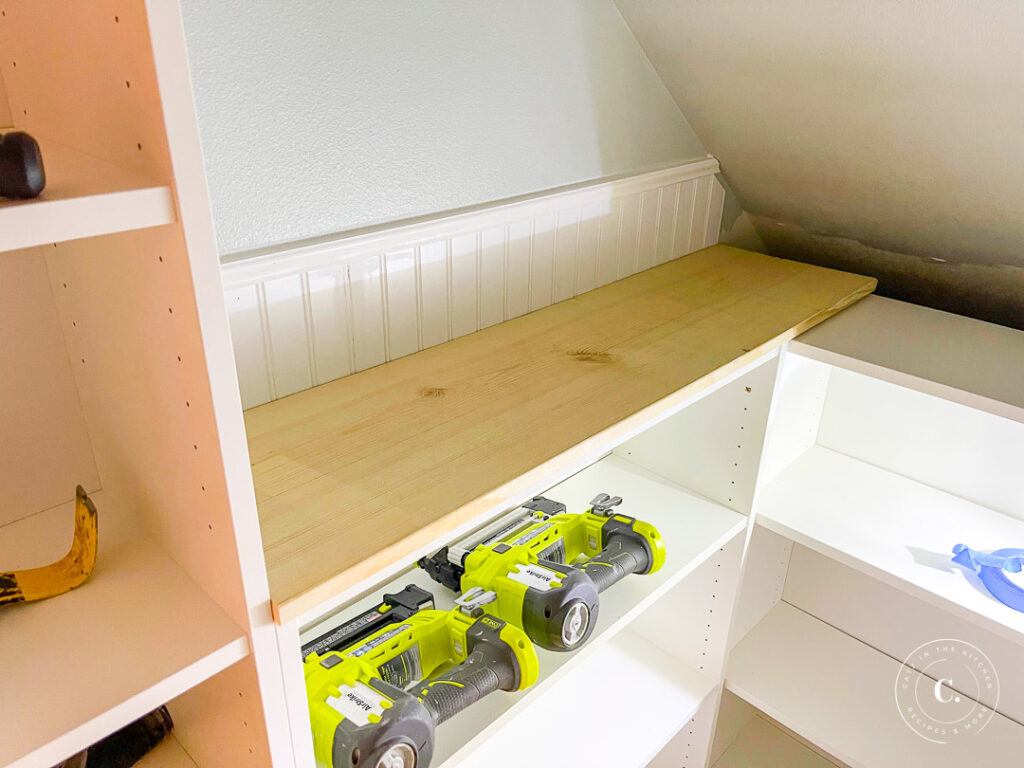
For the tops of the shelving units, I wanted to add a nice finish with some stained pine "countertops," which I thought would add some contrast and create a level, durable, useful space for storing additional items. To do this, I purchased some 1x12 pine boards and cut them to length. Since the shelves are 11 inches deep, and a 12 inch pine board is actually only 11.25 inches wide, there was no need to trim the width. The tiny overhang worked just fine for this application (as you would normally have on a countertop).
Here's where I made a big mistake in trying to be efficient...and actually being incredibly inefficient in the process. I thought, hey, wouldn't it be great to use some pocket hole joinery to connect my "countertops" before installation, get them all sanded, stained, and sealed, and then install them? That way, they'll be all square and finished, I won't have to mask anything and deal with stain in the closet, won't have to work in that small space...etc? Brilliant.
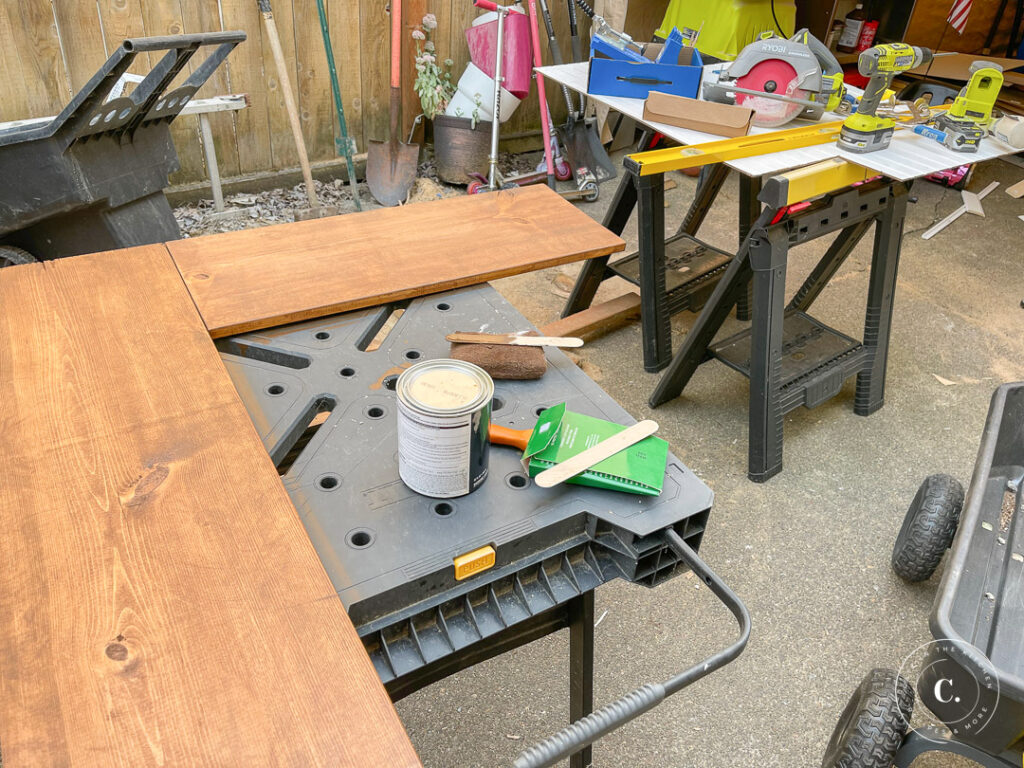
So that's what I did. And worked beautifully...until I tried to bring it into the closet and install it. Yeah, there was literally no way whatsoever to fit this big L-shaped piece of wood into its appointed place in the closet. In fact, over the course of trying to put it in, all I managed to do was damage my freshly painted walls and ceiling. Brilliant. I took it back outside, removed the carefully installed pocket hole screws, and dejectedly resigned myself to installing it in two pieces...
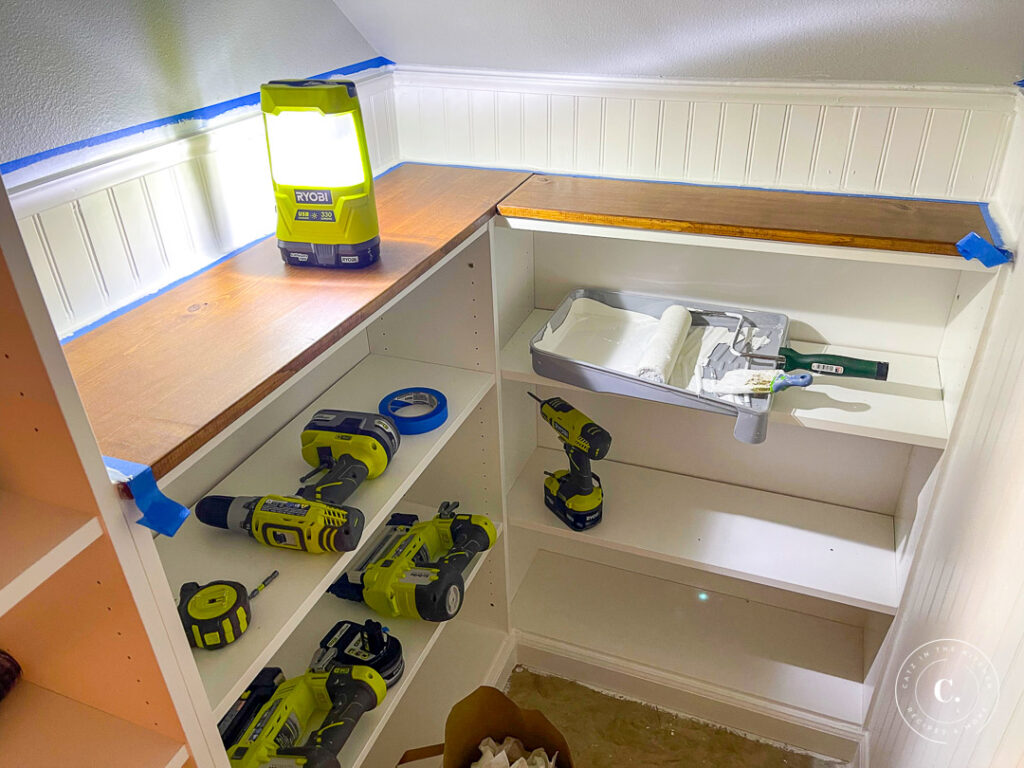
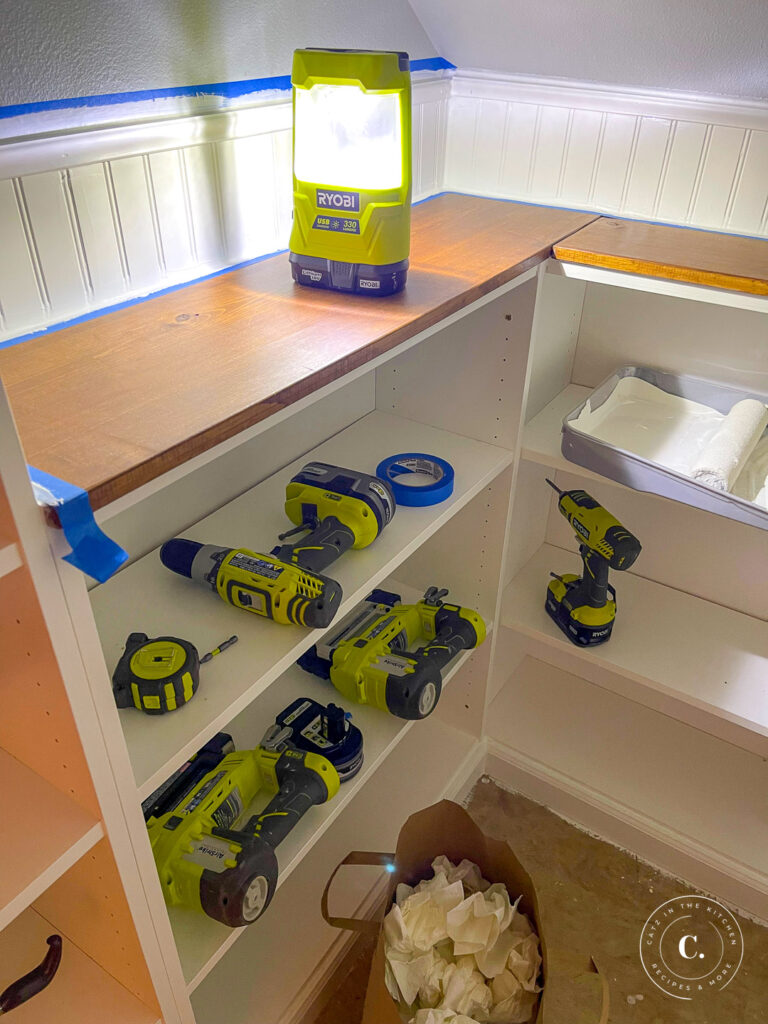
In the end, of course, if made no difference. I secured the "countertops" to the tops of the IKEA shelves from underneath with more of the short (1.25 inch) woodscrews. With the "countertops" in, I installed the remaining beadboard (using some scrap wood behind it to give it something to install into), along with the top moulding, and then caulked and speckled the heck out of everything.
While waiting for various things (caulking, spackling, paint) to dry, I had also reinstalled the baseboard moulding up against the exposed wall and the bottom edges of the IKEA units. This is a key component of giving the shelving the appearance of being "built-in". I had to trim the lengths of the baseboard pieces down considerably, of course, as all of the lengths had gotten much shorter! With that done, though, it was time to figure out the floor.
Originally, I had planned to follow Shanty2Chic's example and put down some kind of flooring - they used peel-and-stick tile. I also considered extending our laminate wood flooring into the closet-turned-pantry. I had realized one thing early on, however - whatever I used, that trap door was going to be a pain. Peel-and-stick tile could be cut and placed very precisely, but with the exposed edges, would likely wear and peel up over time. The laminate, on the other hand, is a "floating floor" install, so some kind of method of holding down the edges would need to be used all around the edges of the trap door. All possible, but I was intrigued by a third option...using floor paint!
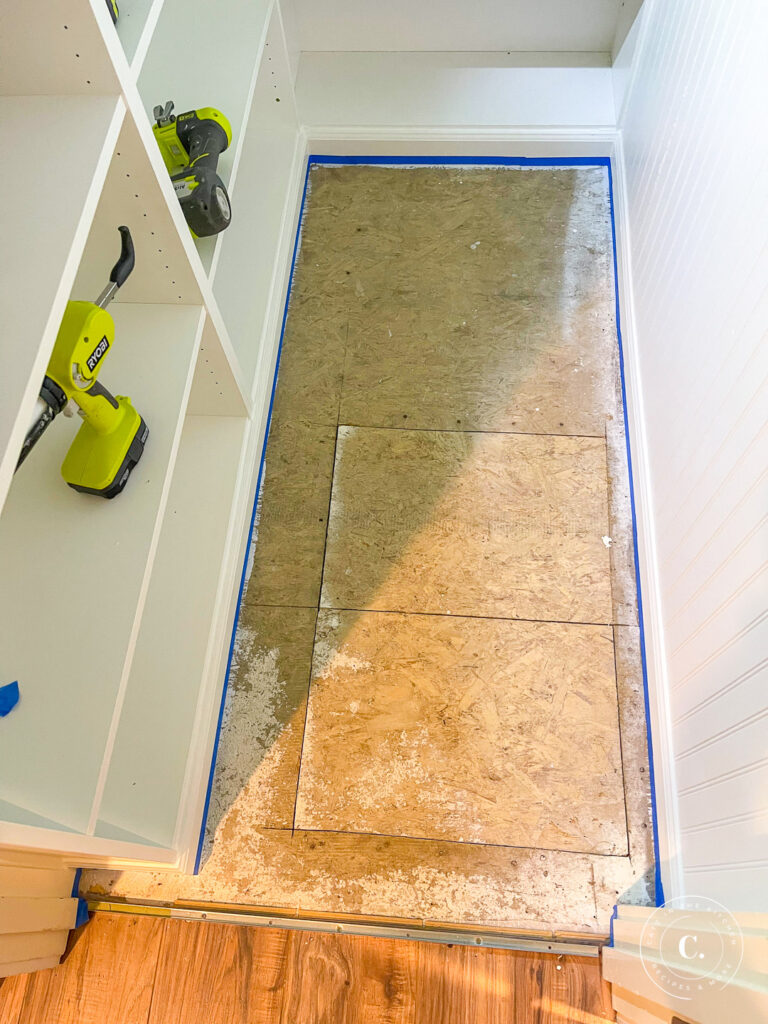
The idea of a heavy duty floor paint was simple, inexpensive, and obviously solve any and all problems related to the trap door. Plus, I figured, if we didn't like it...the floor would still be flat, just a different color, so we go back to installing one of the options we started with originally (though we would have to pull the baseboard off again). I started by prepping the rough subfloor with Kilz primer, which was a key step in smoothing out the surface.

Once I was satisfied with the smoothness of the floor, I then finished it off with this porch and patio floor paint from Home Depot in "Bridal Veil" (again, just sharing what we used - nothing sponsored here). We knew we were going to cover most of the flooring surface with a runner-style rug, so we weren't too worried about the floor looking perfect - it was essentially going to be a backdrop.
The rug took a couple of weeks to arrive, so I was curious how the painted flooring surface would hold up to traffic in the interim - it did great. I guess I shouldn't have been surprised, as it's designed for high-traffic outdoor surfaces like patios, but it proved itself resistant to stains and easy to clean during the short period we lived with it uncovered.
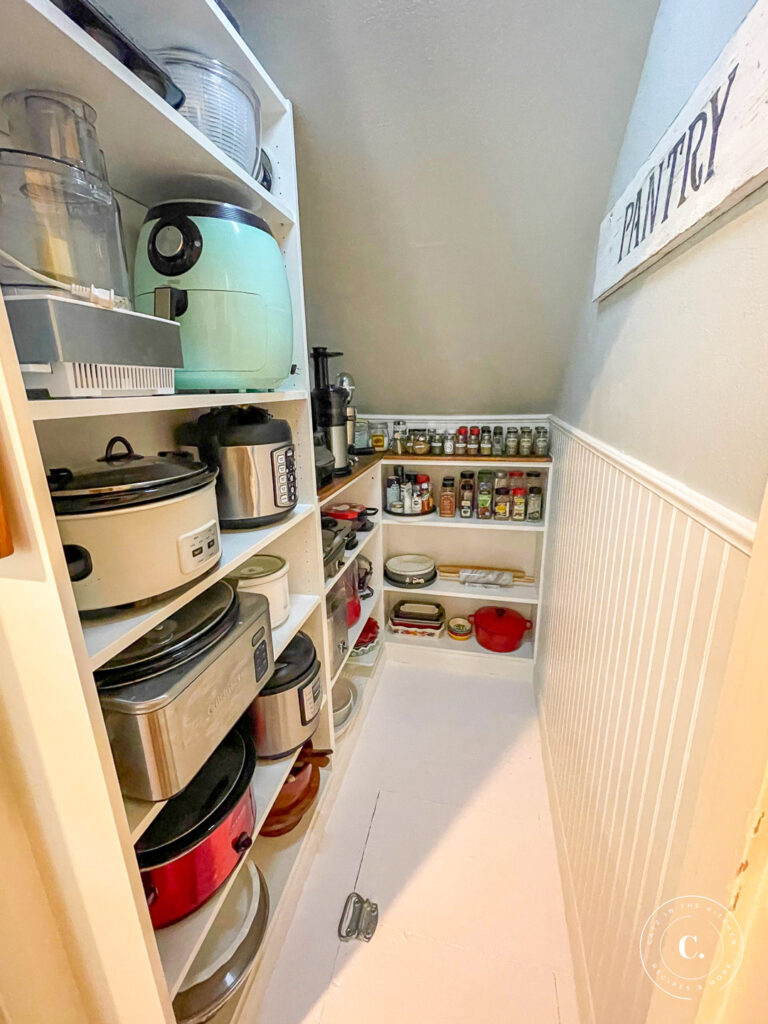
Chels had a wide variety of displaced kitchen items that were eagerly awaiting placement their new home, so we started moving in platters, slow cookers, rice makers, rolling pins, spices...you name it...right away. As soon as the paint was dry enough to walk on, the new space began to fill up with items that had either been overcrowding the pantry in the kitchen, living on random shelves in the garage, or cluttering up the kitchen counters and cabinets.
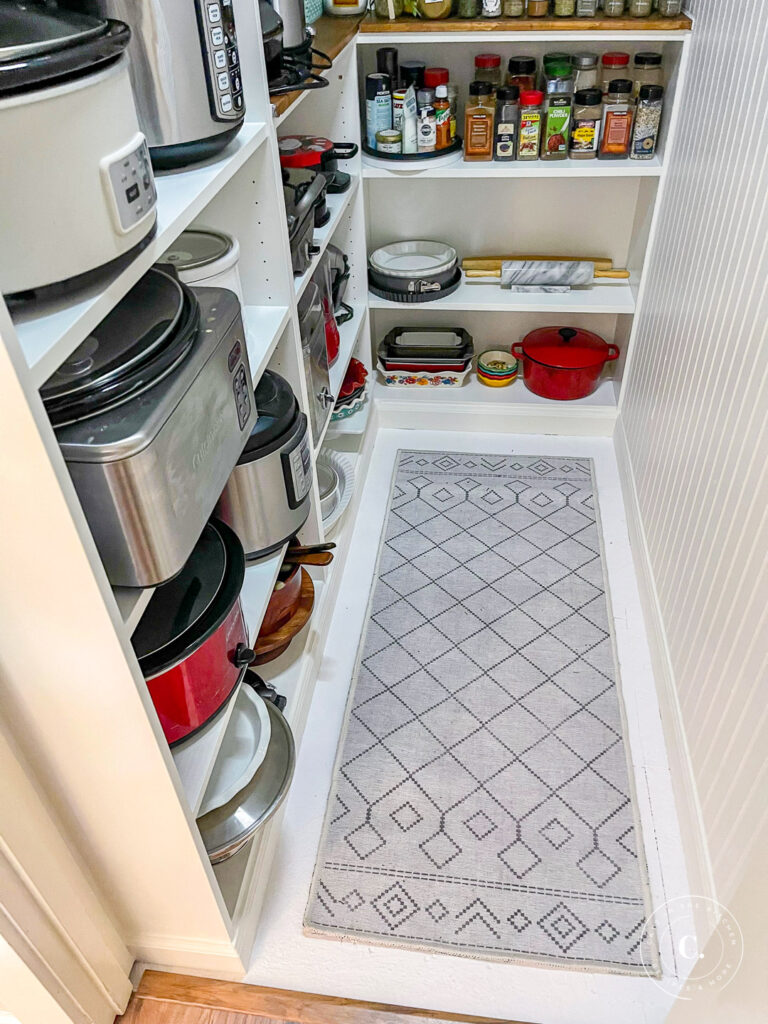
Chels continued to work on the organization - what was the right height for the heavier items, what was the shelf height needed for the tallest appliances, and so on, and by the time the rug showed up (we chose this 2x5 runner from Well Woven), she had things pretty well dialed in. The runner filled the space perfectly...and brought the added benefit of concealing the problematic trap door, while still keeping it easily accessible!
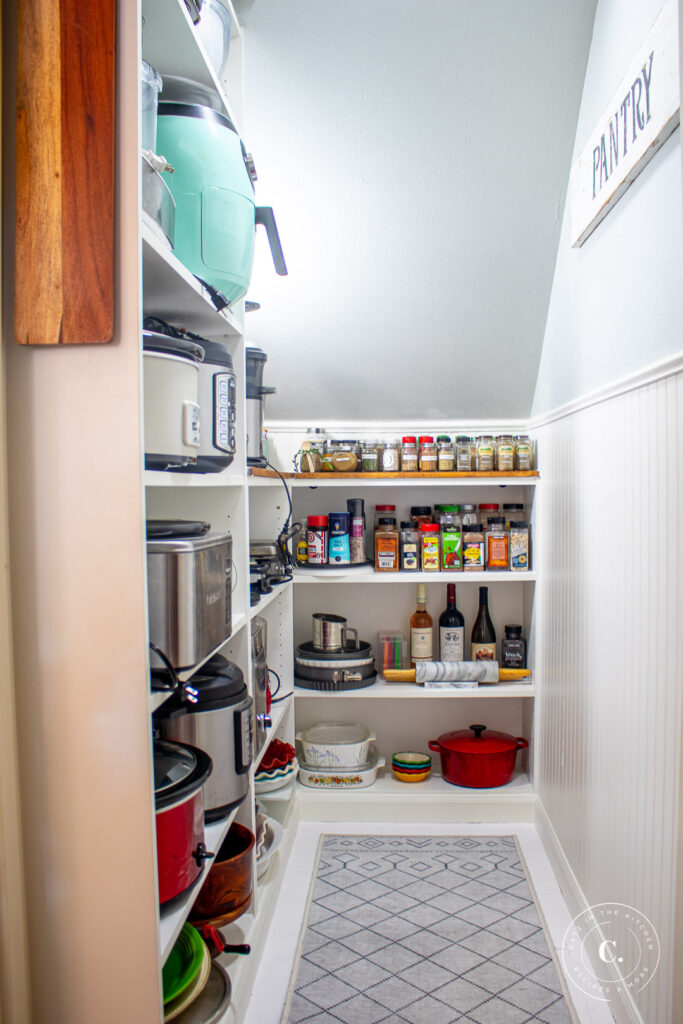
One of the last problems we had to solve for was light. There was no wired lighting in the closet, and I didn't really want to tackle the wiring myself or involve an electrician. In the past, we had stuck up a battery-powered LED light from time to time, so we followed a similar track here. I purchased two rechargeable "soft" LEDs and mounted one to the ceiling, and the other to the lefthand side of the pantry, to add a little more light to shelving in the back. So far, they've worked great! We have to recharge them once every couple of months, and they provide a pleasant, soft white light throughout the space.
We finished this project in early September of last year, so we've been living with it for six months now, and it's been one of favorite, most practical DIY projects yet! We're able to keep our kitchen gadgets and appliances much more organized and accessible and spend far less time trying to figure out where things are! It also allows us to continue to expand our "pantry" of spices, which is wonderful for cooking and experimenting, but was not so great for overcrowding in the kitchen pantry...
So, if you happen to have an underused coat closet under the stairs (or anywhere else), this is a great way to expand your kitchen storage without actually adding on to your home! I estimate that our total cost for this project was right around $300-400, mostly comprised of the IKEA shelving units and the paint, though I would point out that I used a small portion of each can of paint, so there's quite a bit left over for future projects.
If you decide to undertake a similar project, we'd love to hear about it! Leave a comment below!
DIY Under the Stairs Closet Pantry Conversion
We're sharing our experience working through our DIY under-the-stairs coat closet pantry conversion! Our underused closet is now so useful!
Materials
- 1 IKEA 31 ½" x 11" x 79 ½" Billy Bookcase
- 2 IKEA 31 ½" x 11" x 41 ¾" Billy Bookcases
- 1 1x12 8-ft pine board
- 1 gal wall paint
- 1 gal heavy duty stain blocker, sealer, and primer (won't use it all)
- 1 gal interior/exterior porch and patio paint (won't use it all)
- caulking (at least 3-5 tubes, recommend using flexible caulking that won't crack when your interior walls shift through the seasons)
- 1.25" interior wood screws (est about 50, recommend T25 star drive)
- 2.5" interior wood screws (est about 25, recommend T25 star drive)
- 1 qt wood stain
- 1 qt matte polyurethane (I prefer water-based over oil-based, especially for interior projects)
- painter's tape, for masking
- 1 4x8 sheet bead board paneling (or more, depending on your space)
- 2 (approx) 8-ft lengths of cap moulding
Tools
- miter saw
- drill
- impact driver
- brad nailer
- narrow crown stapler
- caulking gun
- tape measure
- level
- straightedge / yardstick
Instructions
See detailed instructions in post above
Notes
Tools and materials will vary depending on the shape and size of the space you are converting


Tonya says
I plan on making an exact replica of this for my under Utilized closet under my stairs. It will be my first DIY project and while I'm a little nervous, I'm more excited about the adventure that awaits! Thank you SO much for sharing!!
Joshua Rief says
Best of luck to you on this project, Tonya! It's worked out wonderfully for us - we use it every day!
Elisha Treacy says
What did you do for the floor transition into the pantry?
Joshua Rief says
Hi, Elisha - I used a step-down transition moulding strip that Home Depot sells in a matching pattern from our laminate flooring. You can see just a bit of it in the third photo up from the bottom.
Cindy Cox says
What were the overall dimensions of your closet prior to starting the make over? I think mine must be smaller, but I want to do this so bad!
Joshua Rief says
Hi, Cindy - I'm not sure how deep the whole closet was, including the "unusable" part at the back, but the "usable" portion is 72" (6 ft) deep, and 41" (3 ft 5 in) wide. Does that help?
Jordan says
I have a similar pantry and this is great inspiration! The small piece of bead board that covers the ceiling angled gap and shelves in the back.. what did you nail it to given the large gap? Thanks!
Joshua Rief says
Hi, Jordan - apologies for not getting to this comment for a few days! It was not the easiest gap to solve for, no question. I ended up securing a small piece of scrap wood to the back edge of the top of the shelving unit, and nailing the bottom of the beadboard to that. For the top, a few staples at an angle held that in place until I was able to secure it better with the top moulding and caulking (luckily, it doesn't support any weight).
Trish says
Could you share the link to the lighting you used and a photo if where you installed them? Thanks!
Joshua Rief says
Hi, Trish - apologies for not seeing your comment sooner! We used these lights: https://amzn.to/3KvdYqr
They're okay. I don't have a photo handy of where we installed them, but basically put one in the center of the ceiling overhead, and then another behind the shelving on the wall to the left. They serve the purpose, but I'd really like to hardwire something in - on the to-do list for this summer!
Lizz says
We have lived in our house for 17 years and I have been trying to figure out how to create a ‘walk in pantry’ since the day we moved in. I thought about adding walls, knocking out walls and rebuilding, but couldn’t figure out a solution that was financially doable. One night I started looking at ‘under stairs storage solutions’ and stumbled across this post. The lightbulb went off and the measuring tape came out. It was crazy that our space under the stairs appeared to be identical to yours. We ordered the IKEA shelves, built them in about 2 hours and transformed the space into a walk in pantry. We already had a light and electrical outlet thankfully, but upgraded the light to a nice LED flush mount. I can’t believe how much storage this has added! We didn’t pull the carpet (our crawl space door is also in the same spot as yours!) but ordered a cute rug. No wainscoting but have a large chalkboard for a wall accent and a place to note things we need to replace when we run out. Anyway, thank you for posting all the details. With a $250 investment, and a little sweat equity, I finally have my walk in pantry - and LOVE it.
Joshua Rief says
So glad to hear this! And thank you for sharing - really encouraging! We're right there with you - it has made a massive difference. One of our favorite little DIY projects. Good for you for getting it done!
Lizz says
Thanks for the inspiration!!