If you've ever thought about turning your cement porch into a wood deck, it's surprisingly easy! Here are some thoughts, tips, & photos from our experience!

One of the "little" projects that's been on my to-do list for quite awhile (there are so many!) is recovering our front porch. Like every other front porch in our housing development (and, come to think of it, every front porch on every house or apartment we've ever lived in), it's made of cement (okay, technically concrete, but whatever...). While a cement porch is obviously rock solid and virtually maintenance free, it's not homey, attractive, or inviting. Chels in particular really is not a fan of the way concrete feels on bare feet, especially the particular kind typically used for this application, which has lots of little pebbles and what-have-you mixed in.
So, for the first two years we lived here, the result was that no one spent any time on our front porch.
In fact, because we didn't spend any time out there, I just assumed the space was really too small to do anything with anyway. When Chels and I started discussing the particulars of what we wanted to do in the backyard, and researching the feasibility of building a wooden deck atop an existing cement patio, the lightbulb went off for her, and she asked me, "Why couldn't you do this on the front porch, too?" So, I went out and measured the porch. As it turned out, it was over 120 sq ft! Plenty of space to hang out, put out a bench and a table, and so on. I decided this "small" project would be a great dry run for the considerably larger (~300 sq ft) back patio I wanted to tackle later in the summer.
I had then checked a lot of different DIY sites for tutorials and ideas, and while it's very unlikely that any particular resource is going to outline exactly the project you are trying to get done, by pulling together ideas from quite a few, I was able to get an idea of the way I wanted to go. Of all the sites I consulted, this article from The Family Handyman was by far the most helpful and comprehensive.

Materials & Cost
I used the following materials for this project:
- (16) pressure-treated 6 ft 2x4's
- (35) kiln-dried Douglas Fir 8 ft 2x6's
- (2) 12 ft 1x2 PVC planks
- (4) pressure-treated 8 ft 2x4's
- 2.5" deck screws
- 3" masonry screws
- 100 ft of flashing tape
- 1 gal waterproofing deck stain
I did purchase a few other things that you may already have lying around - some fresh masonry hammer drill bits, a new stain brush, and some deck wash. And, of course, if you don't already have a hammer drill and an impact driver, you're going to need those (neither is very expensive)! Altogether, this project ran me about $475. I did take one shortcut, and only time will tell if I'll come to regret it! The biggest expense here, of course, is the decking itself. Because my porch is covered, and on the side of the house that gets the least rain and wind exposure, I decided to only go with pressure-treated wood for the sleepers (the foundation, if you will - we'll get to that in a minute) and the trim. For the actual decking surface, I went with kiln-dried fir, which, I'm told, other than cedar and pressure-treated wood, has one of the highest tolerances to weather. And then, of course, I waterproofed it. But, this is Oregon. So we'll see. The boards are installed in such a way that they would be very easy for me to replace one-off if needed, but hopefully it won't come to that, at least not anytime soon. Consider this my own personal experiment...if you want to be totally assured that your deck will last a long, long time, obviously use pressure-treated wood or composite decking. When I do my back patio, which is not covered and takes a beating every winter, I will absolutely have to!
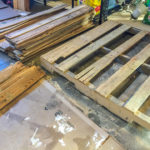
Sleepers

"Sleepers" are, apparently, the name for the beams supporting the deck surface, laid directly atop the concrete. They run perpendicular to the actual deck boards, and elevate the surface slightly, allowing the decking to avoid contact with the ground. Additionally, when the sleepers themselves are elevated slightly with small PVC spacers, as we chose to do, none of the project's wood is in contact with the ground, and any rain or water that might run off or under the deck boards flows right out without sitting under or pooling around any of the wood structure.

For the PVC spacers, I bought 12-foot pieces of PVC trim, and cut them into 3 ½-inch pieces, three to a sleeper (my sleepers were only six feet long - with a wider porch or patio, you would want to use more, of course. With the spacers under the sleepers, the total thickness of the sleeper is increased to about two inches, and you want your masonry screw to penetrate the concrete by at least an inch. For this application, I used 3 ½-inch long masonry screws, for which I predrilled holes that were about 1 ¾-inch deep.

After securing each sleeper with three masonry screws (one through each spacer), they were pretty rock solid (well, one was a little iffy because of where it was sitting - I borrowed the kids' sidewalk chalk to write a warning message on it - DO NOT STEP!). Our 20-ish foot long porch needed 16 sleepers spaced 16 inches apart.

As a final weather-proofing step, I took Family Handyman's advice and covered each sleeper in flashing tape. You could save around $50 by skipping this step, but as water drains through the slats in your decking, it inevitably ends up...on top of the sleepers. With the flashing tape, the water runs off the deck, onto the flashing tape, and then off onto the cement, while the sleeper itself stays nice and dry. To avoid any water pooling between the decking and the sleepers, this seemed like a worthwhile step to me.
Decking
To me, laying the sleepers was the most challenging part of this project. Drilling into cement and working with masonry screws is a lot harder than working with wood, and once that part was done, the rest seemed easy. The rest, of course, is laying the decking. My 2x6's were eight feet long, so it was mostly just a matter of making sure anywhere a deck board ended was in the center of sleeper. Given that the sleepers are 16 inches apart, center to center, that actually isn't too hard to do with eight-foot boards. You'll end up with some funky recurring measurements, to be sure, especially if, like our porch, you find it's actually a little over 20 feet long, so nothing is quite even. I left about a ¼-inch gap between each row of boards.

I put two deck screws in wherever the deck boards ended on or crossed over a sleeper. I'm sure this goes without saying, but in case there are still any deck screws out there with a phillips head - don't buy them. Get the star drive screws! No stripping, no slipping - so much better. Also, use an impact driver, as I mentioned at the beginning of this post. If you don't have one, buy one - they aren't very expensive, and you'll wonder how you ever lived without one. Believe it or not, the first time I had ever used an impact driver was last year on a Habitat for Humanity build, and I remember just thinking the whole time...I gotta get me one of these... For anyone that's done a lot of decking or roofing, that's probably unimaginable, but for me it was revolutionary, and my little cordless Ryobi impact driver has quickly become one of my favorite tools.

I finished off the deck surface with a trim of 2x4's to cover the ends of the sleepers, and that was it! The deck was in! The remaining steps were all pretty simple, if a bit time-consuming. First, I washed the deck with some wood deck cleaner, just to remove any leftover residue from processing. Next, I masked off my house and pillars and put down a couple of thin coats of waterproofing deck stain (getting that stuff into the cracks between the boards is a PAIN - if anyone knows a good way to do that, please do share!). Finally, I used a couple of pressure-treated 2x4's to create a small trim border around the base of each pillar, giving the whole thing more of a finished look (haven't stained those yet, but I probably will).
Note: There are some great comments from readers at the end of this post about ways to get the strain in-between the boards, from staining the sides ahead of time, to using some nifty purpose-built tools. Good ideas!

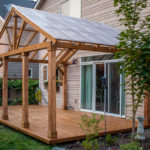
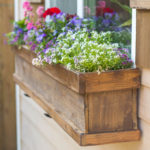
Chels prettied the space up with this inexpensive but very smooth and comfortable little porch glider, half a whiskey barrel turned upside down for a table, and some outdoor pillows and silk flowers. It's become a really attractive space, hopefully given us a bit of extra curb appeal, and, most importantly, we hang out there now! Without a doubt, our little front porch has gotten more use in the two or three months since we finished this project than it got in the whole two years we lived here before that!
Here are some more of our DIY projects - check them out!


If you have any questions or comments (or tips!), please comment below and let me know - thank you!


Tim says
Hey! Had a question about step height and standard compliance to avoid anyone tripping.
Having the porch raised up, does that cause an issues with expected step height?
Joshua Rief says
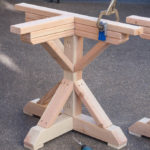
Hi, Tim! Sorry for the delayed reply - we were out of town last week. Adding the decking to the cement pad took what was a 6-inch step to about a 10.5-inch step. Definitely a little high, especially for kiddos or older folks. We ended up building out a step to bridge the gap, using 4x4's mounted on PVC pads, trimmed and wrapped in pressure-treated 2x6's. That cut the first step to 5.5 inches, and the second one to 5 inches, which is much more manageable. Hope that helps!
Peter says
Was your concrete deck level? Mine has a very slight slant. Any suggestions on what to do? My area is also a rectangle about 7 feet deep by 20 long. Any suggestions? Should I not worry about it?
Joshua Rief says
Hi, Peter - this one (front deck) was very close to level, and so I didn't worry about it. With my back deck, we had a major slant, and definitely had to take action to correct the leveling of the wood overlay.
Jennifer Eisen says
Hi, I was wondering if you know how to extend the deck over the concrete and into the lawn. What foundation would you use for the dirt area under the deck, and how would it be level to the boards on the concrete?
Joshua Rief says
Hi, Jennifer - I actually just did this last year, extending our wood-over-cement deck surface out over our lawn! You can check out that process in the "DIY Floating Deck & Fire Pit" post. I ended up deciding not to try to match the height exactly, and instead just incorporated a small step down onto the new surface.
Karin says
So how did this hold up? I am worried about the cement heaving when the weather freezes. Or don't you live in that kind of climate?
Joshua Rief says
Hi, Karin - it's held up perfectly, exceeding my expectations, frankly. We did this in spring of 2017, as I recall, so it's been six years now. I haven't had to do any maintenance, and it looks as good as it did when we put it up. We're in the PNW, so not the Midwest or anything, but it definitely gets below freezing for a good chunk of the winter, and we've had ice and snow storms, etc. So far, so good!
Karin says
I am wondering about the cement heaving or expanding in freezing weather. Does it pull on the boards?
Joshua Rief says
Hi, Karin - so far (and it's been 5+ years, I believe), this has not been a problem for us. It doesn't get below zero here or anything, but we have consistent stretches where it dips down into the teens and 20's.
Julie-Ann says
Thank you so much for this. I don't have a lot of money and was looking for options to cover very ugly concrete. You cometed deck.looks great.
Joshua Rief says
Hope it works out well for you!!
David Beck says
A detailed and practical guide on how to transform a cement porch into a beautiful wood deck, offering a budget-friendly way to enhance outdoor living spaces. The before-and-after photos showcase the impressive results, inspiring readers to tackle similar projects with confidence.
Joshua Rief says
Thanks, David!
Lou says
I would have lowered the 2x4 trim and extended my deck boards over by an inch or two
Joshua Rief says
Hi, Lou - not totally certain I follow. You're saying you would have had the trim tucked underneath the deck boards? Thanks for reading and commenting!
Rose Adams says
Your project(s) are great (I checked out a few). You mentioned there were comments about how to stain in-between the deck boards. Unfortunately, I couldn't find those. Do you remember tips?
Joshua Rief says
Hi, Rose - thank you! I scrolled way back and tried to find them - looks like most of the helpful comments from others were from late 2018 into mid-2019. They suggested a number of things, from pre-treating or staining the boards before installation to using something called a "gap wheel" that you can buy on Amazon to get the stain in the cracks. Quite a few nifty ideas in there.