If you've ever thought about turning your cement porch into a wood deck, it's surprisingly easy! Here are some thoughts, tips, & photos from our experience!

One of the "little" projects that's been on my to-do list for quite awhile (there are so many!) is recovering our front porch. Like every other front porch in our housing development (and, come to think of it, every front porch on every house or apartment we've ever lived in), it's made of cement (okay, technically concrete, but whatever...). While a cement porch is obviously rock solid and virtually maintenance free, it's not homey, attractive, or inviting. Chels in particular really is not a fan of the way concrete feels on bare feet, especially the particular kind typically used for this application, which has lots of little pebbles and what-have-you mixed in.
So, for the first two years we lived here, the result was that no one spent any time on our front porch.
In fact, because we didn't spend any time out there, I just assumed the space was really too small to do anything with anyway. When Chels and I started discussing the particulars of what we wanted to do in the backyard, and researching the feasibility of building a wooden deck atop an existing cement patio, the lightbulb went off for her, and she asked me, "Why couldn't you do this on the front porch, too?" So, I went out and measured the porch. As it turned out, it was over 120 sq ft! Plenty of space to hang out, put out a bench and a table, and so on. I decided this "small" project would be a great dry run for the considerably larger (~300 sq ft) back patio I wanted to tackle later in the summer.
I had then checked a lot of different DIY sites for tutorials and ideas, and while it's very unlikely that any particular resource is going to outline exactly the project you are trying to get done, by pulling together ideas from quite a few, I was able to get an idea of the way I wanted to go. Of all the sites I consulted, this article from The Family Handyman was by far the most helpful and comprehensive.

Materials & Cost
I used the following materials for this project:
- (16) pressure-treated 6 ft 2x4's
- (35) kiln-dried Douglas Fir 8 ft 2x6's
- (2) 12 ft 1x2 PVC planks
- (4) pressure-treated 8 ft 2x4's
- 2.5" deck screws
- 3" masonry screws
- 100 ft of flashing tape
- 1 gal waterproofing deck stain
I did purchase a few other things that you may already have lying around - some fresh masonry hammer drill bits, a new stain brush, and some deck wash. And, of course, if you don't already have a hammer drill and an impact driver, you're going to need those (neither is very expensive)! Altogether, this project ran me about $475. I did take one shortcut, and only time will tell if I'll come to regret it! The biggest expense here, of course, is the decking itself. Because my porch is covered, and on the side of the house that gets the least rain and wind exposure, I decided to only go with pressure-treated wood for the sleepers (the foundation, if you will - we'll get to that in a minute) and the trim. For the actual decking surface, I went with kiln-dried fir, which, I'm told, other than cedar and pressure-treated wood, has one of the highest tolerances to weather. And then, of course, I waterproofed it. But, this is Oregon. So we'll see. The boards are installed in such a way that they would be very easy for me to replace one-off if needed, but hopefully it won't come to that, at least not anytime soon. Consider this my own personal experiment...if you want to be totally assured that your deck will last a long, long time, obviously use pressure-treated wood or composite decking. When I do my back patio, which is not covered and takes a beating every winter, I will absolutely have to!
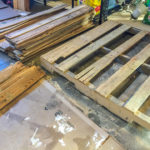
Sleepers

"Sleepers" are, apparently, the name for the beams supporting the deck surface, laid directly atop the concrete. They run perpendicular to the actual deck boards, and elevate the surface slightly, allowing the decking to avoid contact with the ground. Additionally, when the sleepers themselves are elevated slightly with small PVC spacers, as we chose to do, none of the project's wood is in contact with the ground, and any rain or water that might run off or under the deck boards flows right out without sitting under or pooling around any of the wood structure.

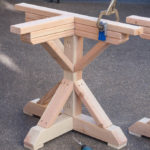
For the PVC spacers, I bought 12-foot pieces of PVC trim, and cut them into 3 ½-inch pieces, three to a sleeper (my sleepers were only six feet long - with a wider porch or patio, you would want to use more, of course. With the spacers under the sleepers, the total thickness of the sleeper is increased to about two inches, and you want your masonry screw to penetrate the concrete by at least an inch. For this application, I used 3 ½-inch long masonry screws, for which I predrilled holes that were about 1 ¾-inch deep.

After securing each sleeper with three masonry screws (one through each spacer), they were pretty rock solid (well, one was a little iffy because of where it was sitting - I borrowed the kids' sidewalk chalk to write a warning message on it - DO NOT STEP!). Our 20-ish foot long porch needed 16 sleepers spaced 16 inches apart.

As a final weather-proofing step, I took Family Handyman's advice and covered each sleeper in flashing tape. You could save around $50 by skipping this step, but as water drains through the slats in your decking, it inevitably ends up...on top of the sleepers. With the flashing tape, the water runs off the deck, onto the flashing tape, and then off onto the cement, while the sleeper itself stays nice and dry. To avoid any water pooling between the decking and the sleepers, this seemed like a worthwhile step to me.
Decking
To me, laying the sleepers was the most challenging part of this project. Drilling into cement and working with masonry screws is a lot harder than working with wood, and once that part was done, the rest seemed easy. The rest, of course, is laying the decking. My 2x6's were eight feet long, so it was mostly just a matter of making sure anywhere a deck board ended was in the center of sleeper. Given that the sleepers are 16 inches apart, center to center, that actually isn't too hard to do with eight-foot boards. You'll end up with some funky recurring measurements, to be sure, especially if, like our porch, you find it's actually a little over 20 feet long, so nothing is quite even. I left about a ¼-inch gap between each row of boards.

I put two deck screws in wherever the deck boards ended on or crossed over a sleeper. I'm sure this goes without saying, but in case there are still any deck screws out there with a phillips head - don't buy them. Get the star drive screws! No stripping, no slipping - so much better. Also, use an impact driver, as I mentioned at the beginning of this post. If you don't have one, buy one - they aren't very expensive, and you'll wonder how you ever lived without one. Believe it or not, the first time I had ever used an impact driver was last year on a Habitat for Humanity build, and I remember just thinking the whole time...I gotta get me one of these... For anyone that's done a lot of decking or roofing, that's probably unimaginable, but for me it was revolutionary, and my little cordless Ryobi impact driver has quickly become one of my favorite tools.

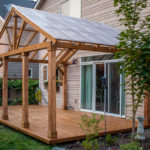
I finished off the deck surface with a trim of 2x4's to cover the ends of the sleepers, and that was it! The deck was in! The remaining steps were all pretty simple, if a bit time-consuming. First, I washed the deck with some wood deck cleaner, just to remove any leftover residue from processing. Next, I masked off my house and pillars and put down a couple of thin coats of waterproofing deck stain (getting that stuff into the cracks between the boards is a PAIN - if anyone knows a good way to do that, please do share!). Finally, I used a couple of pressure-treated 2x4's to create a small trim border around the base of each pillar, giving the whole thing more of a finished look (haven't stained those yet, but I probably will).
Note: There are some great comments from readers at the end of this post about ways to get the strain in-between the boards, from staining the sides ahead of time, to using some nifty purpose-built tools. Good ideas!

Chels prettied the space up with this inexpensive but very smooth and comfortable little porch glider, half a whiskey barrel turned upside down for a table, and some outdoor pillows and silk flowers. It's become a really attractive space, hopefully given us a bit of extra curb appeal, and, most importantly, we hang out there now! Without a doubt, our little front porch has gotten more use in the two or three months since we finished this project than it got in the whole two years we lived here before that!
Here are some more of our DIY projects - check them out!


If you have any questions or comments (or tips!), please comment below and let me know - thank you!


Niki-Dee says
This is such an awesome step by step tutorial!! I have been suggesting to my fiance that we cover our cement porch with wood for years and he wasn't convinced until I found your page! Wonderful job, Thank you for the details and beautiful photos .
Joshua Rief says
Thanks, Niki-Dee! So glad you found it helpful, and best of luck!
JOHN COKOS says
Good approach to the situation of the concrete deck..I did a low budget work around for a front step by applying a piece of silver foil insulation and glueing it down with panel adhesive, then glue and adereing a pre cut and assembled tongue and grove deck that I made with my brad nailer and adhesive. So far so good, took out all the unevenness of the concrete step and absorbs the shock of foot traffic...
Joshua Rief says
Thanks, John! That is a clever fix!
Laura says
This looks fantastic! Question: how would you handle the blocks of the porch was not level. I ask because I’ve been considering doing this to my front porch, but in some spots the cement has cracked and shifted (then was patched by previous owner). But it’s not level in some spots. How would you compensate for something like this? Thanks!
Joshua Rief says
Hi, Laura - that's an interesting question for sure. If you have the flexibility to raise the wood deck covering a little higher than just the sleepers would, I would use the technique I used on the back deck (there's another post on that one), which gives you the ability to cut blocks of different heights to even out an unlevel surface. Would your porch allow for a little extra height? The other option I can think of is layering the little PVC blocks to even out the unlevel sections. You can buy the PVC in several different widths, which might help, too.
Neil says
Joshua, Very nice job on the front porch. I also like that fact that you response to all of the comments. Very positive! My wife and I are remodeling a Dutch Colonial built in 1895 that is mostly mountain stone. We have a fairly large slate stone patio encased in mountain stone retaining walls that is capped with slate. I also have mountain stone risers with slate steps going down. The slate is flaking real bad and some of the stones are breaking up. My plan is to pull all of the slate stones and build a recessed wood deck so that the deck surface is flush with the top of the mountain stone retaining wall. I am going to pour concrete footer for the base and build up off of them for the deck. I have a pretty good plan for that. But, I also want to replace the steps with wood. Was considering doing what you have done by pulling the slate tops (they are cracked and flaking), pouring concrete steps and encasing them with in wood. I want the steps to be solid with no give in them climbing. I figured the concrete would be able to provide that. I am going to finish the entire wood deck and stairs in a Shou Sugi Ban - inspired finish (Wood burning with a dark stain). The deck rails will be done in the same finish with black metal spindles. I am just wavering on how best to construct the steps without wasting money. Any suggesting is greatly appreciated.
Joshua Rief says
Neil, my apologies - we were on vacation when you made this comment, and I missed it coming in! Thanks for the encouraging words - much appreciated. As to your project, it sounds incredible and challenging! I have no experience working with stone, which, to me, seems intimidating! But your plan sounds great. On the steps, I would totally agree - if you pour concrete and build the steps over them with sleepers and pressure-treated lumber, they will be totally solid. The two decks and one set of steps we have built here over concrete are as solid as anything you could hope for - absolutely no give or bowing whatsoever. Have been quite pleased with the result.
Pal S says
I have a similar plan but I'm worried about the change in height of the steps. How did you resolve it?
Joshua Rief says
Hi, Pal - we lived with the change in height for a few weeks, and then decided it was too extreme, especially for small children. I ended up building a small step to split the difference, and mounting it in a very similar way - using PVC spacers underneath 4x4 blocks of wood which were secured to the concrete, and then building the step on top of that. It's held up great for about three years now!
Pal S says
@Joshua Rief Thank you so much for taking the time to reply. I've considered that as well, just not sure how comfortable a 4.5 ish inch step height would be, is it too low? The second option was to split these 3 steps in even height, which would be about 17.5/3 = 5.8 ish inch. Any suggestions?
Joshua Rief says
Hi, Pal - my apologies for the delayed reply! Been a crazy couple of weeks. We're not at home this weekend, but when we get back, I'll measure the steps we did and let you know what I find (the height has worked out really well).
PG says
How do you clean any mess which might go below deck from sides or gaps in the woods
Joshua Rief says
Hi, PG - do you mean just kind of the general leaves and stuff, or something more specific? We don't get much in there, as the gaps are so small. A pressure washing now and again helps, of course.
Pam says
Great job, especially the well-written tutorial with tips! Just wish I'd found your blog earlier this year, when we were trying to decide what to do with our concrete porch. The house we're restoring was built in 1851, & the back wing a side porch were added c. 1860. About 50 years ago the original 7'x30' floor was replaced with concrete, & the end slab has developed several cracks. My husband was in favor of replacing the concrete with a period-appropriate wood floor, but that seemed like a huge & expensive undertaking. After checking several other options, I decided for now to just hide the cracks with large potted plants. However, your idea seems like a practical solution, without the expense & disruption of removing the entire concrete floor. Thank you!
Joshua Rief says
Thank you, Pam! I have to admit, restoring a home built in 1851 sounds like a dream, though I'm sure the reality is quite a challenge. I hope this idea works out well for you and your husband!
Ed says
Did you readjust your door seal before wood deck install.
I mean you’ve raised the floor height to like 2 5/8s?
Joshua Rief says
Hi, Ed - no, I didn't. The drop from the door to the cement was pretty dramatic already, so adding the wood didn't bring it up over the level of the door seal. Is that what you meant?
Tim C says
Looks great, and well written. I do have a question about the sleepers. Sleepers are typically strong because their full surface is resting upon the surface below. Having raised the sleepers on spacers, you are effectively using a 2x4 horizontally as a joist, with the span being the space between the spacers. I would think this would sag under weight, and while it can't sag far due to the proximity of the floor beneath, it can. If I were to do this, I think I'd either use a lot more spacers, or something continuous.
Joshua Rief says
Hi, Tim - thanks! Right - my concern with using something continuous is that I didn't want to create anywhere for water to pool or not run out. Certainly could see the argument for using more spacers, though. In our case, the front deck has been up since 2016, and the back deck since 2017, and we haven't experienced any sagging of any kind - so far, so good!
corey says
@Joshua Rief, great job, I am inspired to give this a go in front of my house. a question about the sleepers, did you over hang them off the front a bit or are the flush? when you attached the face boards are they flush with the block? thanks again
Joshua Rief says
@corey, thanks! I overhung them just a bit. I can't recall the exact measurement, but it wasn't much - maybe half an inch? Something like that? Wanted to ensure that the water running off the underlying concrete would be able to flow out and under the face boards. Hope that helps!
Nadine says
Joshua and Chels.....I love your idea of using PVC trim cut into special size pieces for the spacers under the sleepers. I have been wanting to make our cement patio look cozier for a few years now. Have researched painting, resurfacing, covering with decking, and other. Nothing I have looked into has piqued my interest for varying reasons. But now after seeing your genius method my mind is made up. Thanks for posting.
Joshua Rief says
That's wonderful to hear, Nadine! So glad, and hope it works out great for you!
Sheila says
I love it looks great. Would you please share pictures of your stairs?
Joshua Rief says
@Sheila, Apologies for the delayed response! We were dealing with a bout of illness in our family, and have been quite behind on blog-related activities! Let me see if I can get a photo of the step in here.
Joshua Rief says
Hi, Sheila - let's see if this works...
Not a good picture! We've had about four months of straight rain, so none of my spring and summer pressure washing and clean up is done yet (clearly!), but this little step has held up for 5+ years now with no sagging or caving, so that's encouraging!
Marc says
Hi Joshua, your project was very well explained and detailed so any DIY would be confident to proceed with this project. I do have a question regarding laying the 2x4’s flat using plastic spacers. My project is a10 x14 floating deck over a cement patio. If I were to lay my 2x4’s flat am I compromising the support when laying my deck planks? Most decks I’ve been reading have the boards on edge which gives a stronger support for decking. What do you think?
Joshua Rief says
@Marc, my apologies for the delayed reply! Our family was hit with a bout of illness, and we're running pretty far behind on some of the activities related to the blog here!
If you are working on a floating deck, I would absolutely place the boards on edge. I actually just finished a floating deck project of my own, and this is what I did (although with 2x6's). I only use the flat-laying 2x4's on the concrete, as they have so much support below them.
Hope I didn't respond too late, and that your project is going well!
Charles Georgel says
Have you ever tried too spray the stain, I think you could get it in the cracks it would be a lot easier than brushing. I’m sure a small 1gal. Sprayer isn’t too expensive.
Joshua Rief says
Hi, Charles - that's an interesting idea! I do have a small sprayer. Do you think the stain would sink into the wood the same way if sprayed on?
Charles Georgel says
Just a thought, We just recently did our whole house from bedrooms ,bathrooms, living room kitchen dining All of the house, even in the closets garage, outside foyer, patio in what some one would do just a garage in different floor texture from outside too inside outside is rougher than inside, Note we did not want as the installer puts it, do you want to slide it your socks smooth!!! No I’m 70, my is 69 we don’t need broken hips. This goes on directly on cement they just do a little sanding.
Joshua Rief says
Wow! That is really interesting. How did it turn out? Are you happy with it?
Robin says
We have been wanting to cover our concrete porch with wood! The problem is, part of the concrete slab cracked and partially fell on one end because the old (1970s) wood supports underneath rotted. Now there is a hollow space underneath. My husband used car jacks to temporarily lift the part that fell so that we can get in the house. We would have to attach any supports for the wood to the house which is brick. Any ideas?
Joshua Rief says
Hi, Robin! Sorry for the delayed reply here. A lot going on with the new little guy and everything. :) That is quite a situation! I don't see any issue with having to attach supports to the brick. You could use the same masonry fastening techniques I used to secure the sleepers to the concrete (and on the covered deck post I wrote as well) to secure brackets to the brick, I would think. You might have to check what permits are required, etc, but other than that, seems like it might be possible. As an alternative, would it be possible to drop a concrete support block down there and build a support on top of that, like you would for a floating deck?