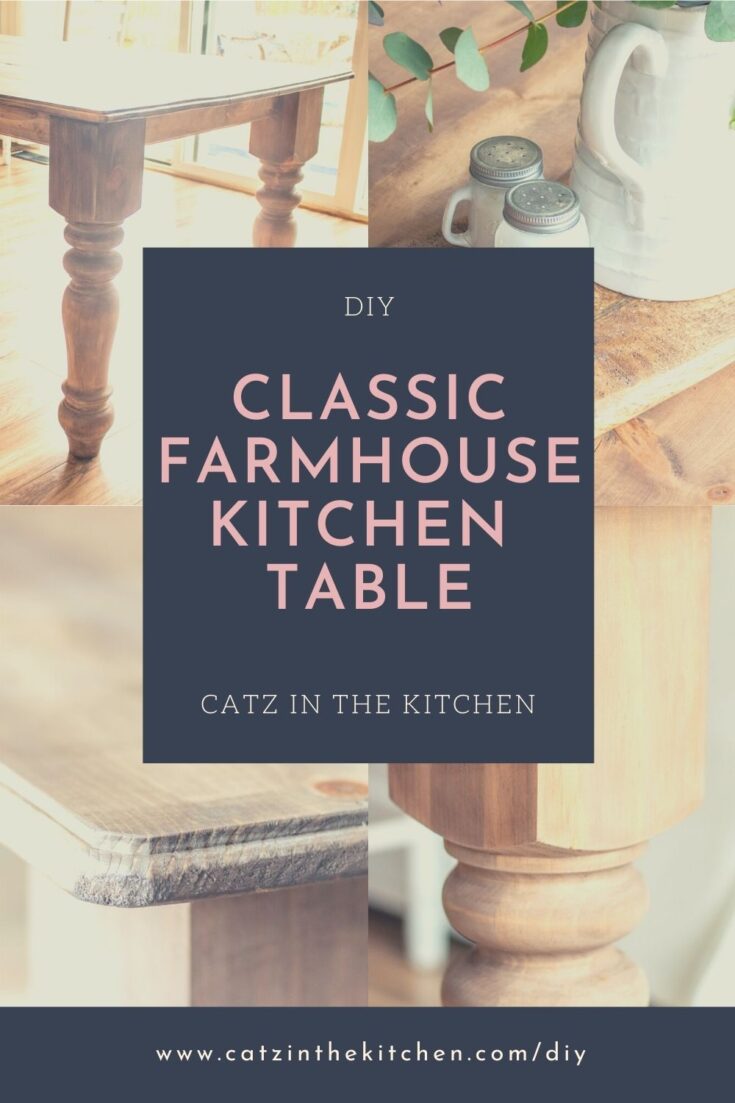
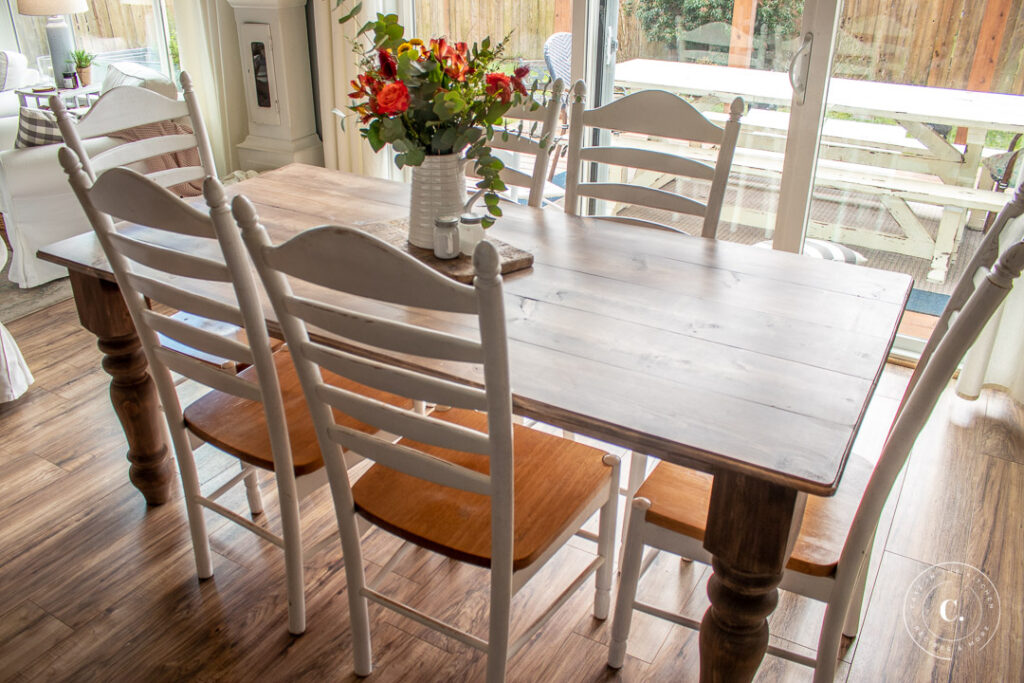
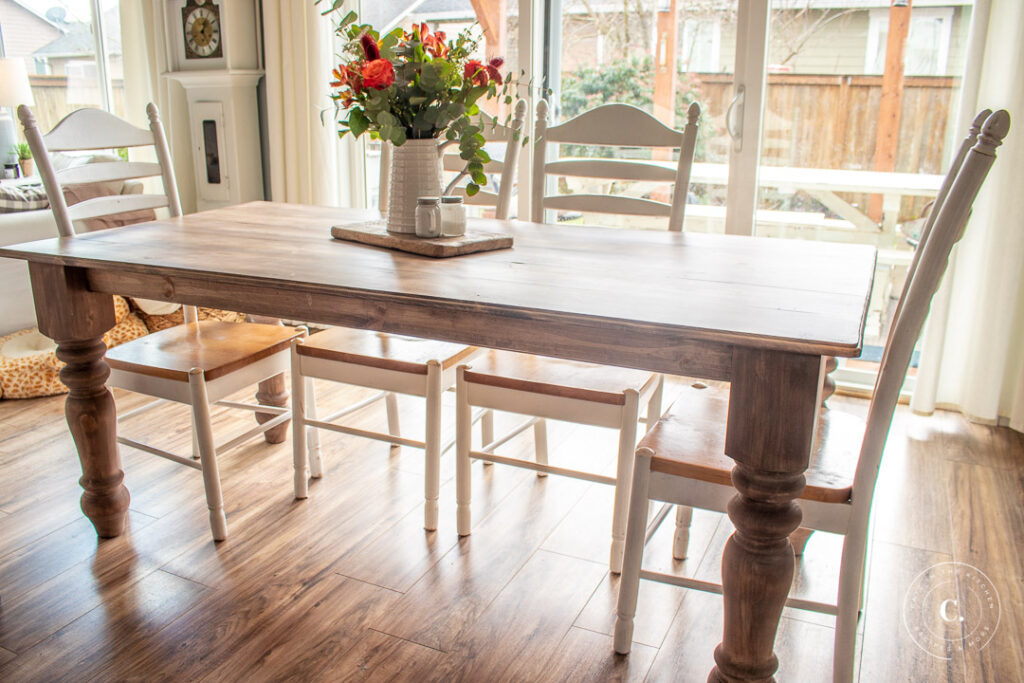
As our family grew, we realized needed a bigger kitchen table, so here's our experience building our own DIY classic farmhouse kitchen table!
First things first. Yes, I have blogged about building "farmhouse" style tables not once, not twice, but three times previously. First, back in 2016, I shared my first attempt at a new dining room table for our family, which we still use today in our "formal" dining room. It's a beast, and definitely the most obviously "amateur" of my tables (I'm still an amateur, but I've learned a few things along the way). Even so, it serves its purpose and has held hundreds of family meals at this point. Later that same year, I built this round table for our breakfast area, and then a couple of years later, this large outdoor dining table based on one Chels saw during our first visit to the Magnolia Silos. So...why another table?
That answer is pretty simple. We've outgrown the round table in our breakfast area. We love it, but it's just too small. There are six of us now, soon to be seven, and we've gotten to a place where so much of life just happens in that room, and around that table! It's where the kids do a lot of their school work, where we eat two to three meals a day, where we play games, where we sit around on weekends to have brunch...it's easily the most used "surface" in our home. And that surface needed to grow a bit.
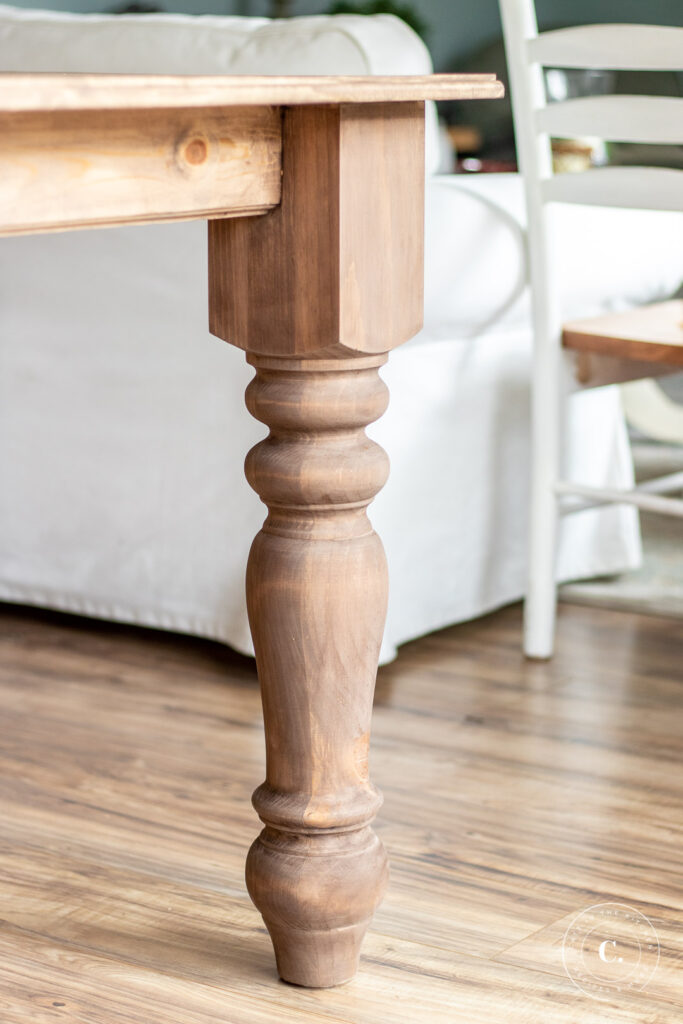
First, Chels spent several months tracking stuff on Craigslist, Facebook Marketplace, OfferUp - you know, the usual suspects. She found a couple of candidates, but honestly, nothing that was quite what we wanted, or at least not what we wanted for less than $1000! Nice farmhouse tables apparently aren't cheap! So I did what I have a tendency to do, and began to explore the idea of building my own. My biggest issue: we wanted those beautiful, curved "French country farmhouse" table legs. And I don't own a lathe.
It's no secret that I'm totally down to use a new project as an excuse to buy a new tool. If you have read these DIY posts in the past, you know that's true, and I have a garage full of (mostly Ryobi - not an ad, just the truth) tools to prove it. But a lathe? A lathe big enough to turn a five-inch thick, 30-inch long table leg? I just couldn't rationalize it. Maybe some day. When I have a shop. And a lot of time and money.
Before we go any further, I’ll give you my standard disclaimer about my own DIY abilities and the purpose of this post. First, I’m an amateur! That will be obvious as we go forward, I’m sure! My goal here is not to instruct you on every aspect of how to execute a similar project, but merely to share my experiences, what seemed to work well and what didn’t, what resources I found helpful, what I would do differently, and so on, in an effort to make your experience better and easier should you embark on a project of your own! Naturally, any DIY project you take is always at your own risk – you know the drill (no pun intended).
Table Legs
Again, I want to emphasize that this post isn't sponsored by anyone. Just sharing my experience here. After deciding I was interested in building my own table, I stumbled across the Carolina Leg Company. To my shock (seriously), they not only appeared to make the big, chunky table legs I wanted, but they were incredibly reasonable, and available on Amazon! (In retrospect, it may have been slightly less expensive to buy direct from their site, though I didn't realize it at the time.)
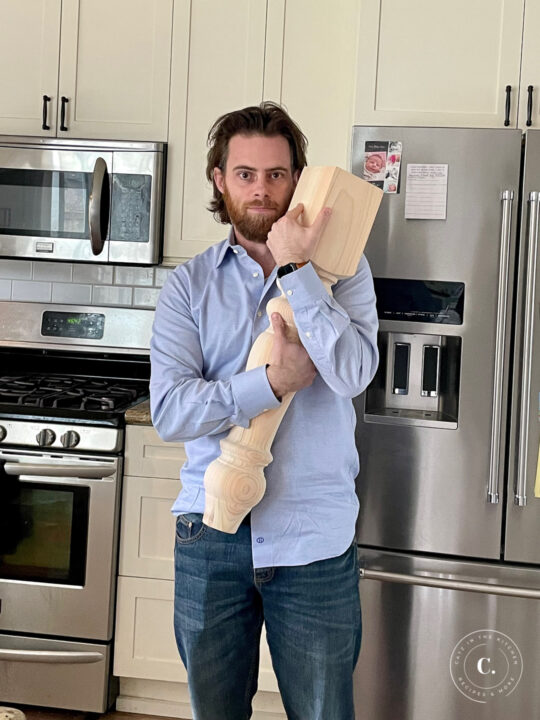
Since the right legs are probably the most important part of this project, I want to focus for just another moment on this - I told Chels when the box of legs arrived that it may have been the happiest I've ever been with an Amazon purchase! The quality of the packaging was exquisite, showing the same care and attention to detail that went into the craftsmanship itself. When I opened the box, I was immediately greeted with that fresh-cut wood smell (you know, the one that inspired the meme below...), and I knew these things were going to be beautiful.

With the legs in hand (literally, as you can see), I was ready to get started. Because Chels wanted this to be as simple and classic as possible, the fact that I wasn't lathing the legs myself basically only left me with one task...build the top.
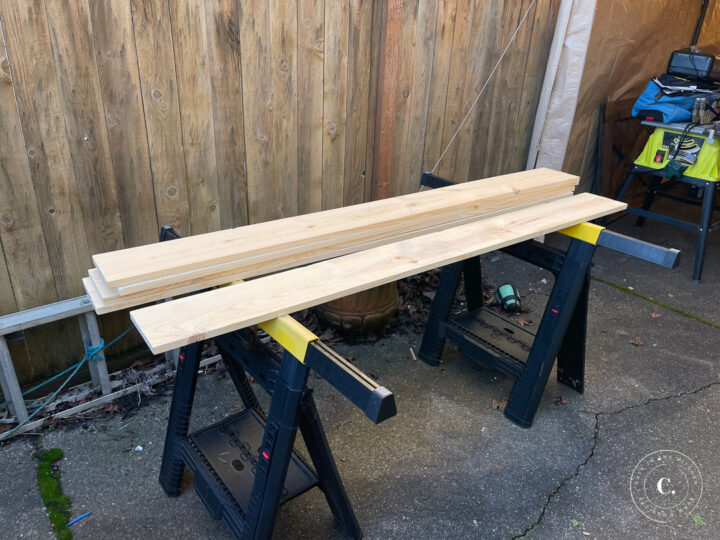
Table Top
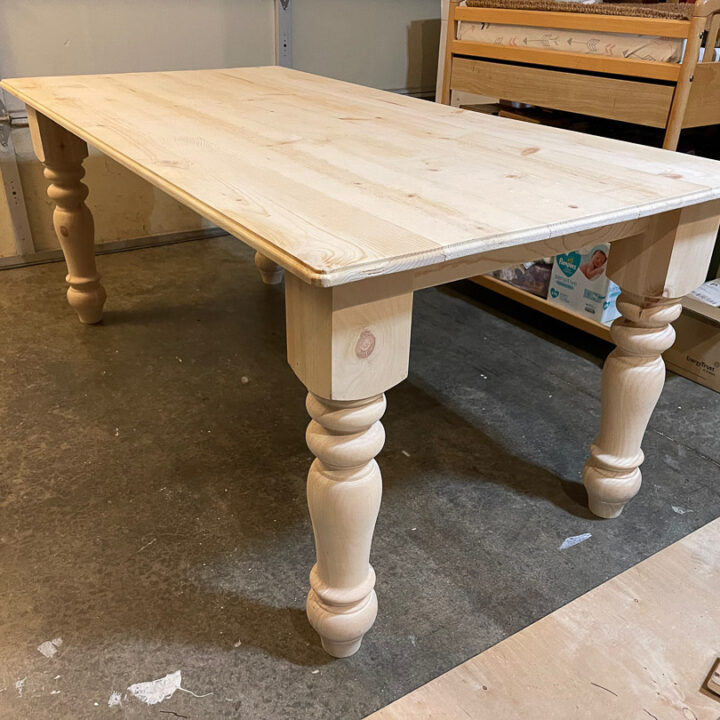
As I write this, wood is EXPENSIVE. Doesn't really matter what kind of wood you decide to use - it's all expensive as heck. In my case, while I know it's not as durable (I may not be passing this on to my grandkids, I guess), I usually just use the pine boards you can pick up in a variety of sizes at Home Depot - they call them "whitewood common boards". Actually, truth is, they'll probably hold up just fine over the long haul. They'll nick and scratch a bit here and there ("soft" wood), but when rustic is the style you're going for, you actually want a bit of that in your project - helps avoid the "made yesterday" look. At any rate, while this wood was still expensive compared to a couple of years ago, it's a lot cheaper than working with a premium hardwood like oak or maple.
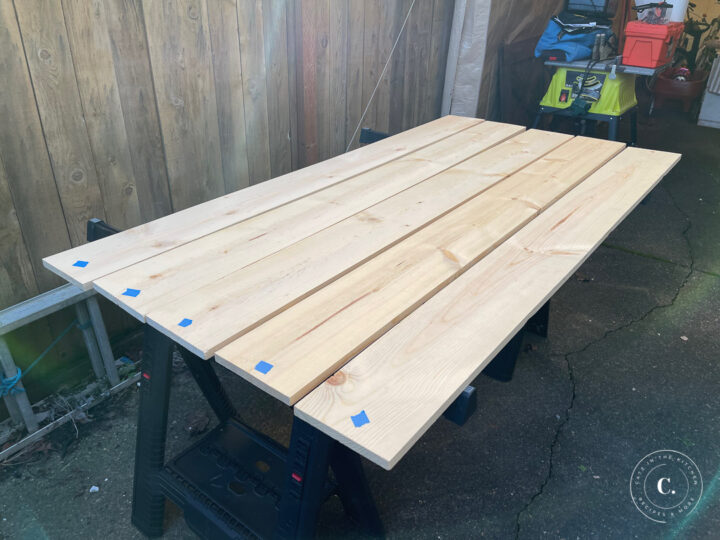
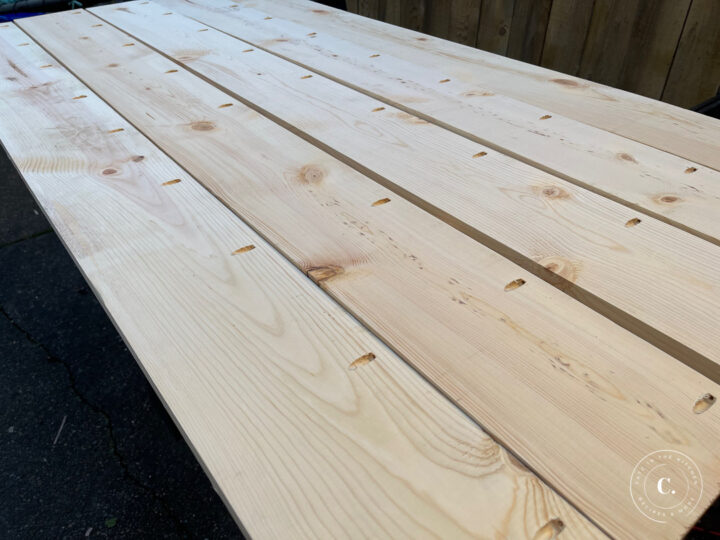
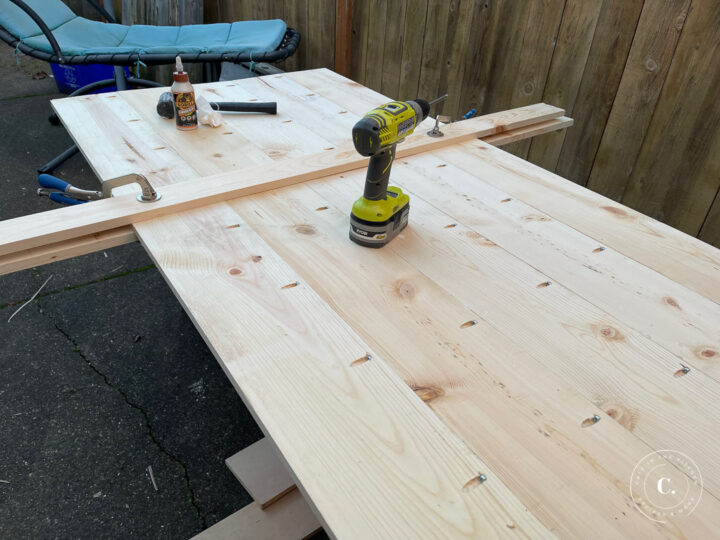
I debated doing breadboard ends on this tabletop, but ultimately decided against it in favor of the simple planked design. My first task was to examine each board and determine which side had the most character - which side I wanted to see everyday. I marked each "pretty" side with a piece of blue painters' tape so I wouldn't forget, and flipped them all over to start the joinery process! Because I was able to buy these planks in six-foot lengths, simply lining up five 1x8 boards (7.25 in wide each) gave me the roughly 6 ft x 3 ft tabletop I wanted without even making any cuts at the start.
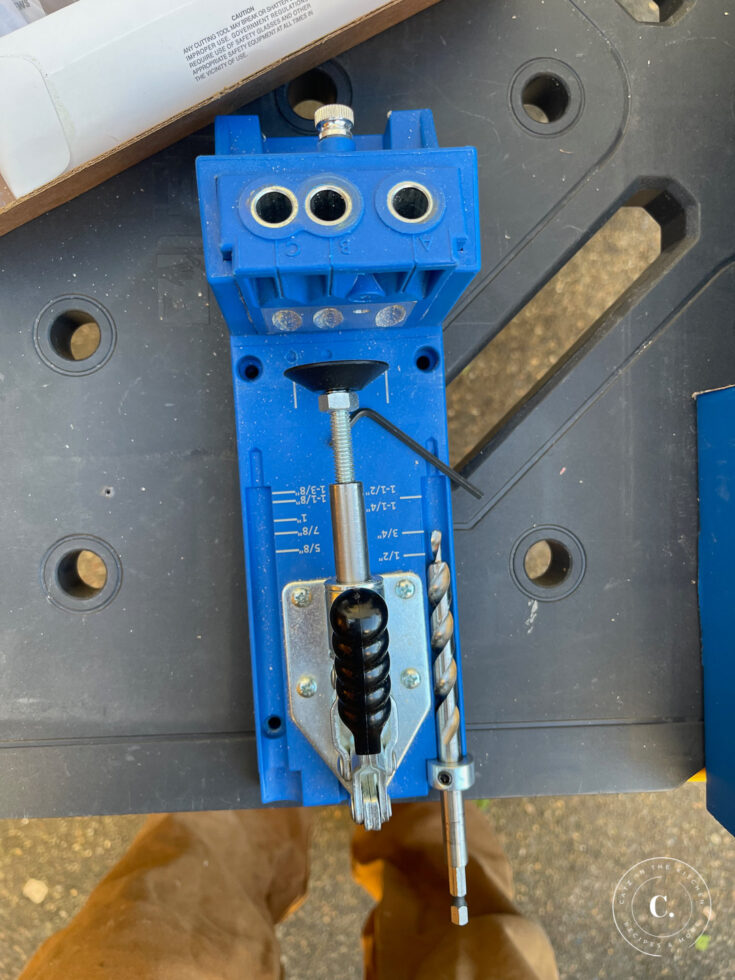
As the kids say, it had been a minute since I'd used my Kreg Jig. I LOVE my Kreg Jig (again, nothing sponsored here), and used it for all of the table projects I mentioned at the beginning of this post, as well as our DIY built in library, among many others. It's just one of those things that comes in handy all the time. But...most of my projects lately have either been outdoor, or something like putting up faux shiplap - things that don't require any pocket joinery. The crux of the matter is that I'd forgotten an important part about how the measurements on the Kreg bit work...but in classic man fashion, was quite sure I was remembering correctly. But I wasn't. See where the tip of the bit is lined up with the ¾" line (which is the width of my pine boards)? Yeah, don't do that. it's the "shoulder" of the bit that you measure to. And I know this. I've probably drilled 500 pocket holes. But that's where moving too fast and not double-checking your work gets you.
Anyway, I didn't realize this mistake (I feel like I made a couple of others, too - was really out of practice, apparently) until I was deep into actually fastening the boards together. It was a small mistake, but it made a frustrating difference. Pocket joinery, while made very simple by companies like Kreg, is still a precise process, and having your bit set too long, too short, etc, does cause problems. The end result here is that I had to be careful with my screws - making sure they didn't go in too far, far enough, that we didn't have tiny metal tips of screws sticking out of the top of the table, and so on. It all worked out! But it added a lot of unnecessary finessing. Moral of the story is double check your measurements and settings. Sort of a "measure twice, cut once" situation.
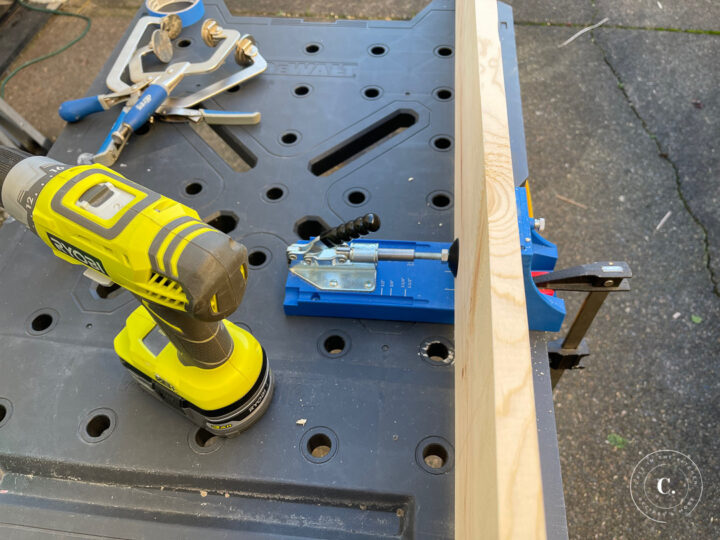
Once I had all of the pocket holes drilled, I was ready to join the boards together. Typically, this is a simple process - you run some wood glue on the surfaces to be joined, clamp them together tightly with face clamps, and fasten with pocket hole screws of the appropriate length (1 ¼", in this case). This, however, is where I ran into my second problem.
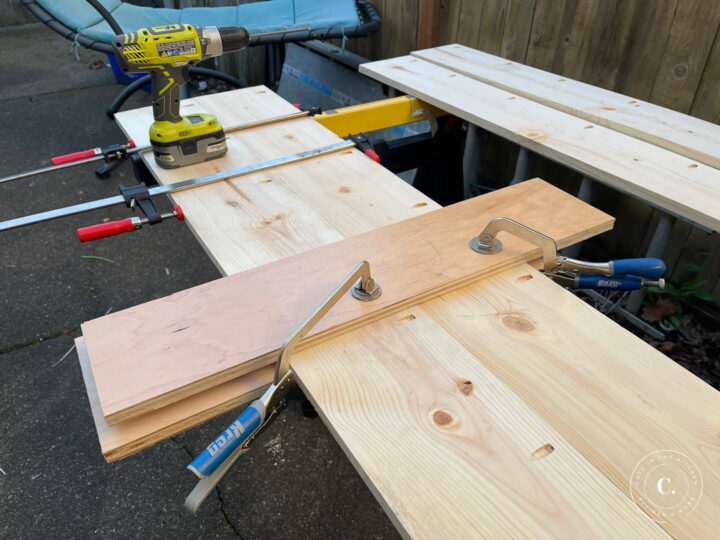
My face clamps work wonderfully for 1x4 and 1x6 boards, with which I typically work. In this case, I chose 1x8's for two reasons - they evenly divided into the width I wanted, and I liked the broad look of the wider planks for the tabletop. My face clamps couldn't reach across the width of the 1x8 to clamp the joint! This was not a problem at the ends of the table top, where I could clamp from the end, but when I got more than six inches or so into the center, I couldn't reach at all. My solution...which mostly worked...is what you see in the photo above. I found some boards that I could use to stretch over the table top, above and below, and clamped them together. It didn't give me quite the force of using the clamps directly, which meant I had more sanding work to do than I would have liked (more planing work, if I was an actual craftsman...), but it worked (I had to switch to longer boards as the table top got wider).
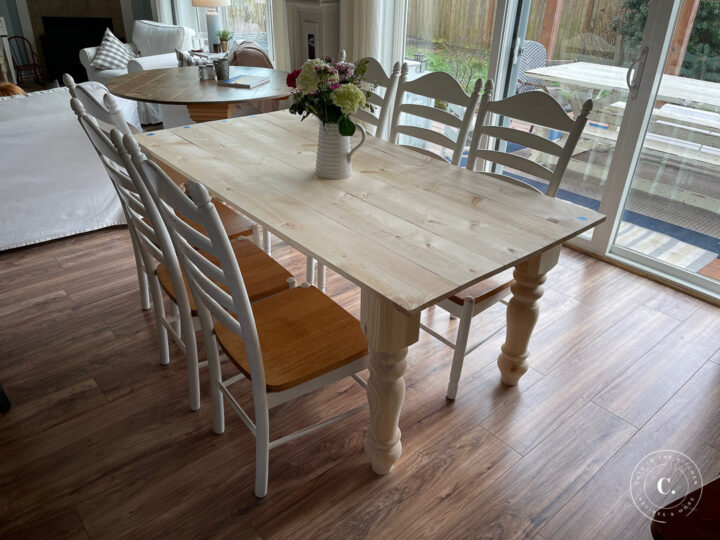
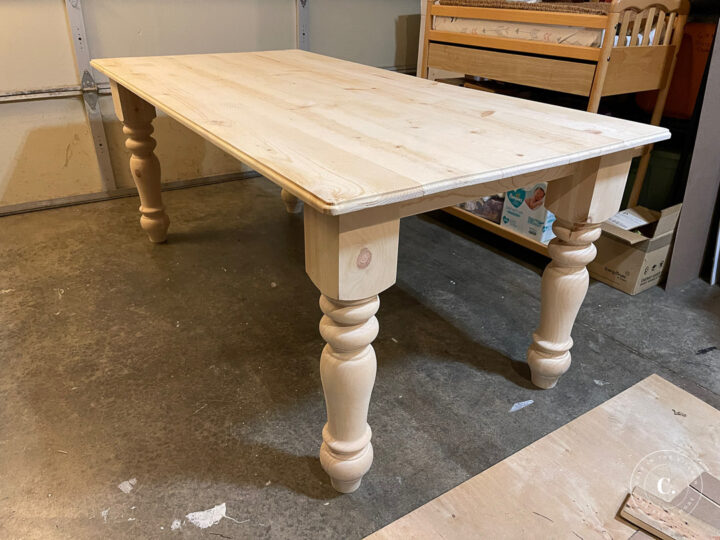
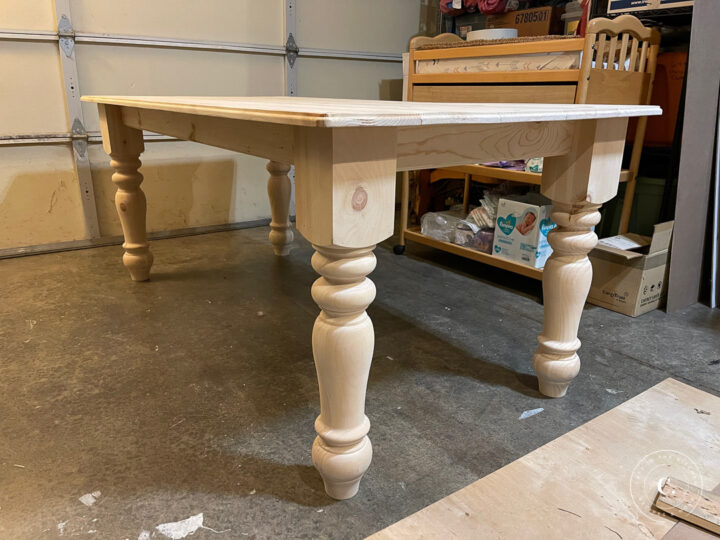
Once the top was all fastened together, I brought it into the house, balanced it on the legs, and made sure it all fit the space before we went any further. These chairs we picked up on Facebook Marketplace (or something) awhile back, and I'd really like to refinish them, but another project for another time. Everything worked, so back outside for routing...
Now, I am an amateur in general when it comes to woodworking, but even more so where routing is concerned. I have played with the router just a bit, and not for very long. Nothing complex. Luckily, what I was looking to do with this table was not complex either! We wanted a simple design for the edge of the table top, which I was able to achieve with what I think is called a round-over bit.
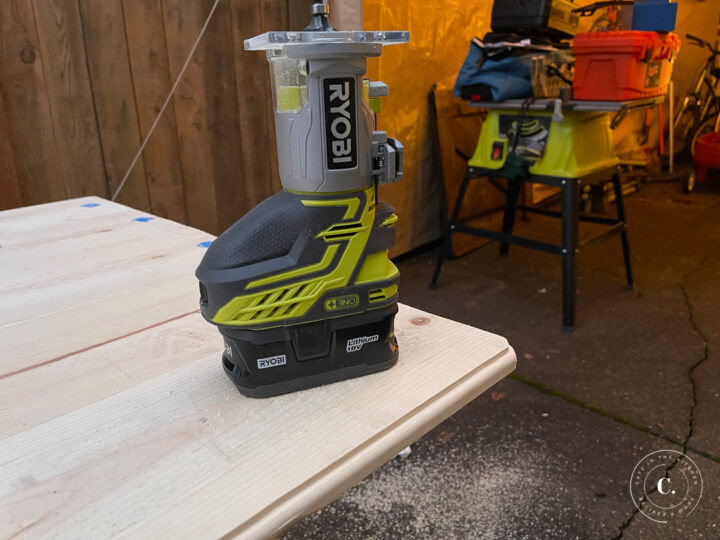
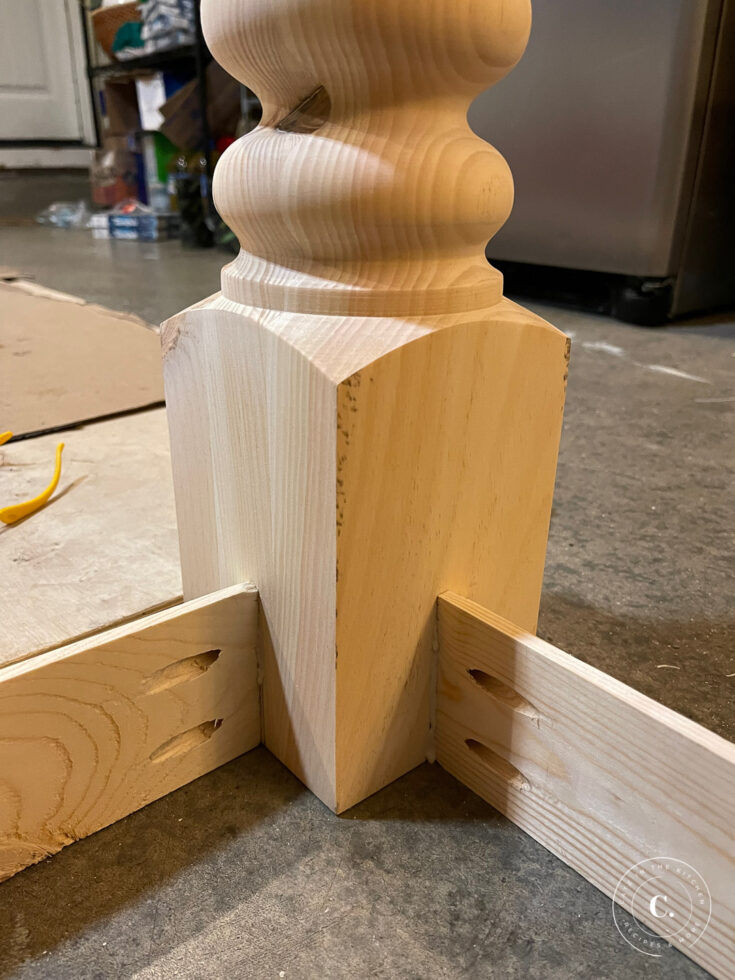
Once the routing was done, and the tabletop was sanded smooth (or at least smooth enough for the rustic style we wanted), it was time to flip it over and figure out the apron measurements. The apron is really simple - it's four boards cut to connect the legs - but I did decide to route the edges as well, and, then, of course, there's the pocket holes to attach them to the legs and the top itself. For some reason I took quite the series of photos on this part, so will post those for you here...
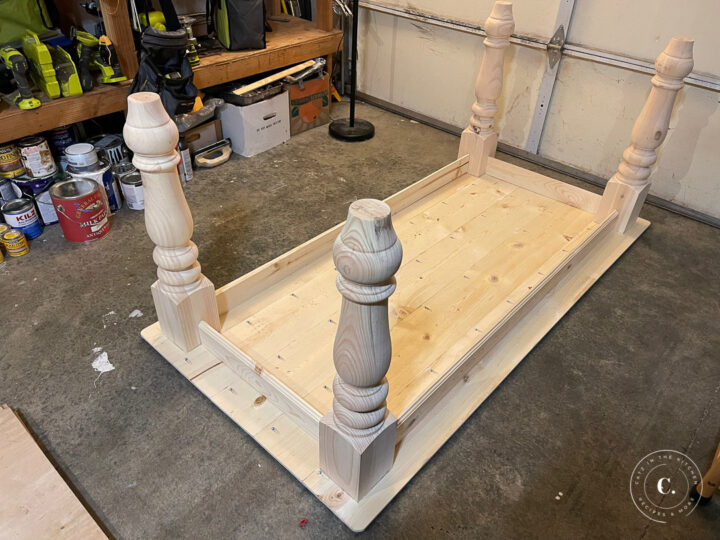
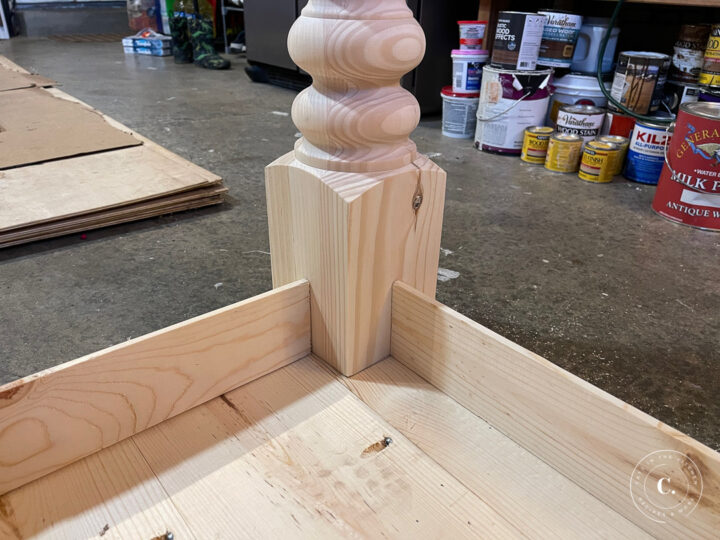

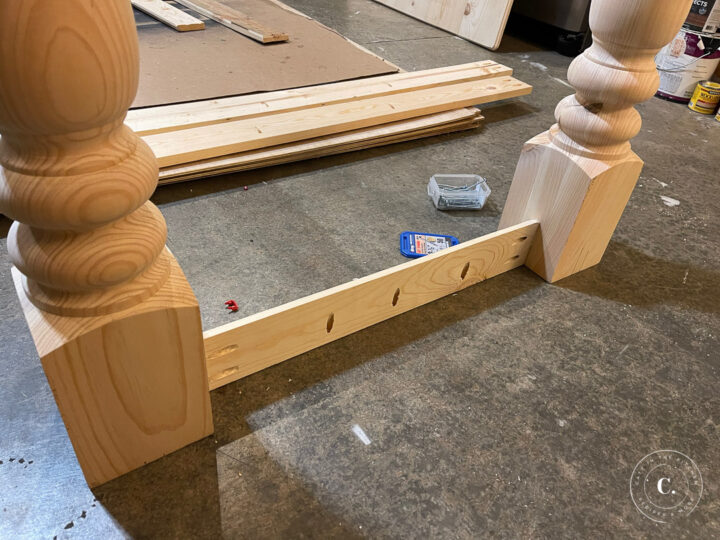
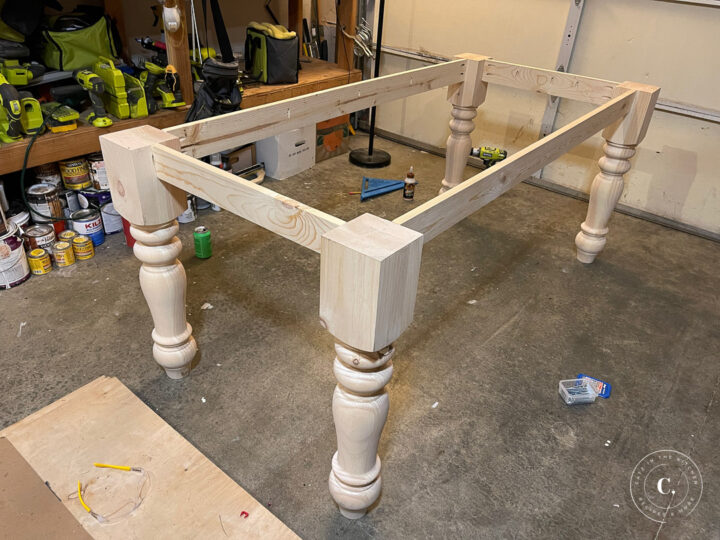
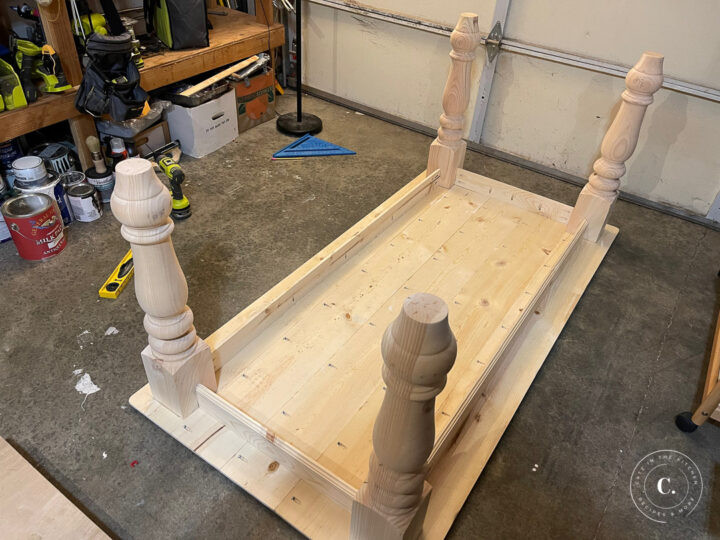
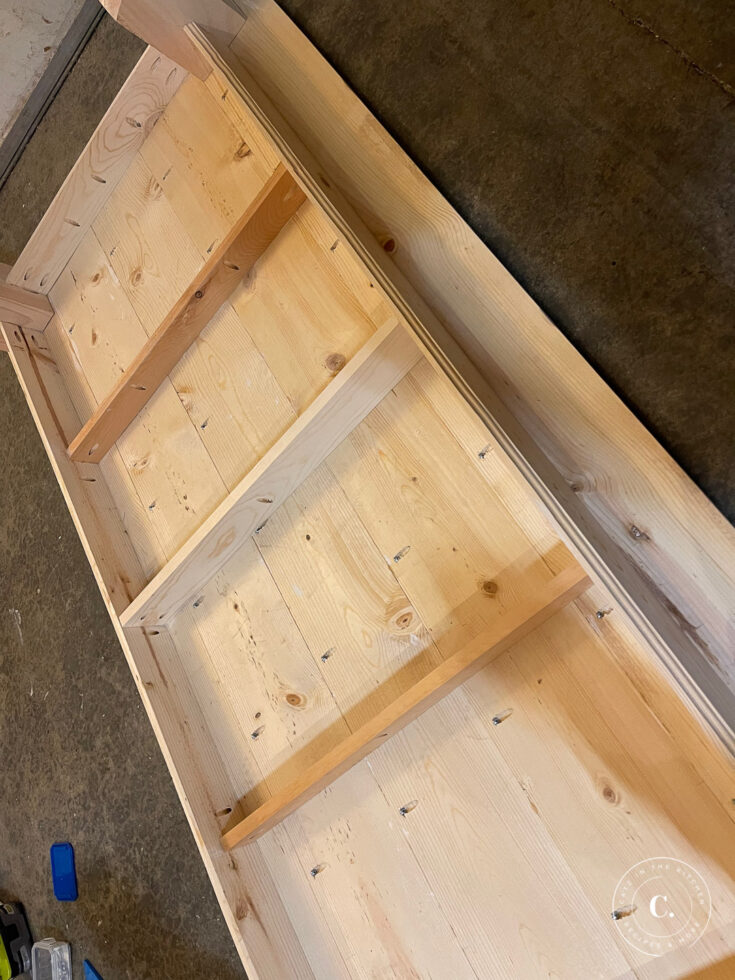
Once the apron was fastened to the legs and the tabletop using pocket hole screws and wood glue, it was time for the last piece - just a few simple braces across the inside. I found three pieces of scrap wood I had lying around that were long enough and narrow enough to fit, cut them to size, added some pocket holes, and glued and screwed them in.
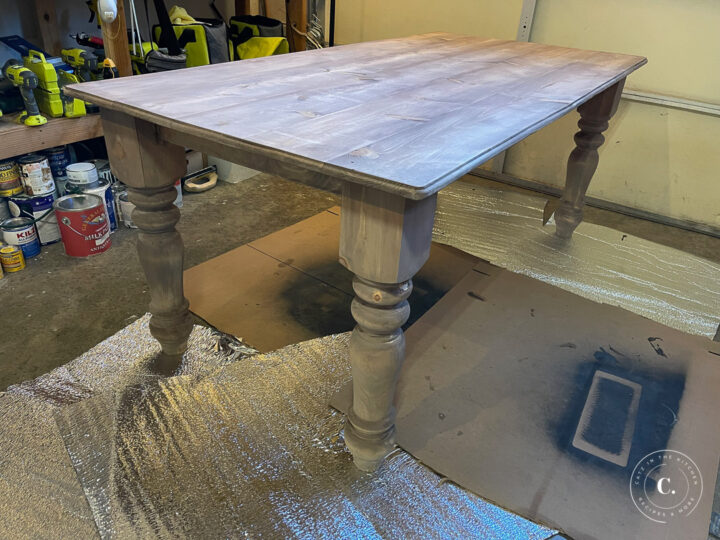
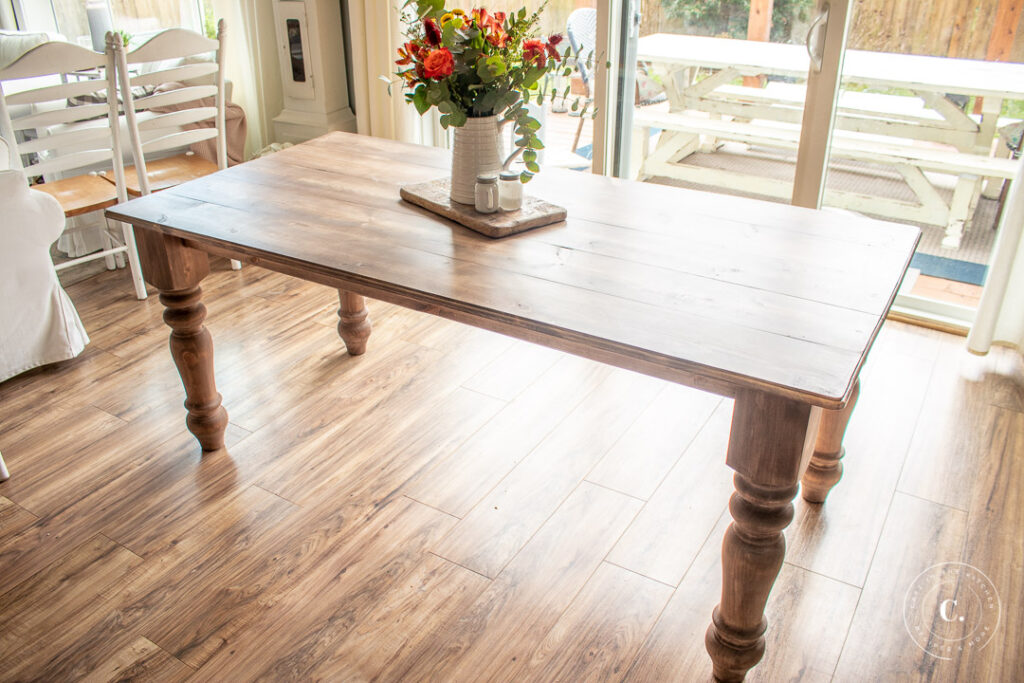
With the braces installed, I flipped the table over - it was time to stain...
Stain
We wanted to use a stain that would get rid of the "blond" color you get with cut pine, but also leave us with a slightly "aged" look that would not imply a brand new or overly finished final product. The legs absorbed the stain differently than the top, and the knots really didn't absorb the stain at all, which left us with a lot of varied character - each leg looks a little different, and is in turn different from the top itself...which we love.
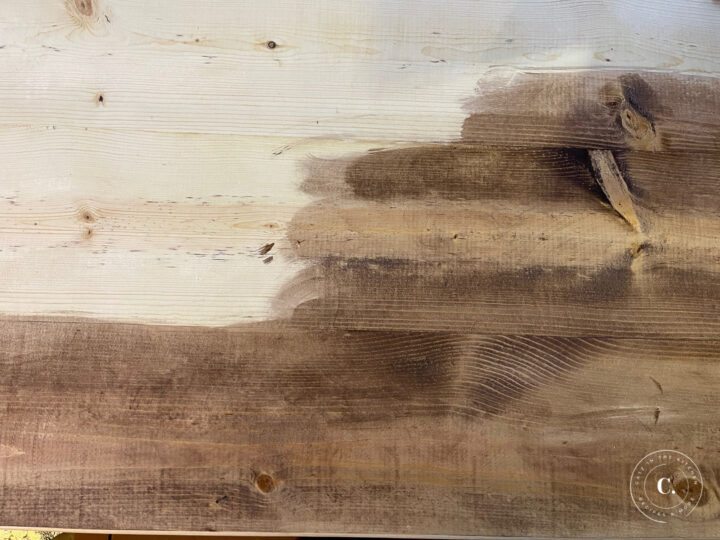

The table took two coats of stain to get the depth of color we wanted, and then I finished it off with a matte finish, fast-drying, water-based polyurethane, which took three thin coats. The poly is a step I personally wouldn't skip for a dining table, especially if you have small children! In the months since I built this table, it's not only lived through a variety of messy meals, cat leaps and skids, and crayons gone astray, but also spills of milk, juice, and lots and lots of water!

The chairs now kind of go with this table and kind of don't. At the very least, I really need to re-finish the seats of the chairs, which are this blonde pine color that isn't in our "palate" for the house at all. Another project for another day...
It's July now, and we've been using this table upwards of two or three times a day for meals, plus homework, work-work, game nights, projects, and more for the last several months. Nothing makes me happier than finishing a project and being able to immediately see it become something that is used constantly and heavily (especially if it survives!). If you decide to undertake a similar project, I hope my experience in building this one is helpful in some way!
DIY Classic Farmhouse Kitchen Table
As our family grew, we realized needed a bigger kitchen table, so here's our experience building our own DIY classic farmhouse kitchen table!
Materials
- 4 29in table legs
- 5 6ft 1x8 boards
- 3 8ft 1x4 boards
- Approx 100 1.25in pocket hole screws
- water-based polyurethane
- water-based stain
- wood glue
Tools
- Electric drill
- Kreg jig
- Circular saw or miter saw
- Jig saw
- Router
- Measuring tape
- Face clamps
- Bar clamps
- Stain applicator pads
- Paint brush for polyurethane
Instructions
- See post above for more details on steps below
- Join 1x8 boards together using pocket joinery and wood glue on the long edges
- Sand table top smooth, slightly round corners, and rout edge if desired
- Cut 1x4's to length for edges and braces (approx 22" for the short ends, 58" for the long ends, and 26" for the braces for my 3ft x 6ft table). Rout exposed edges of apron pieces if desired
- Use pocket joinery and wood glue to attach apron short and long ends to underside of table top and table leg edges, as well as to join tops of table legs to underside of table
- Use pocket joinery and wood glue to secure braces to underside of table and long ends of apron
- Flip table right side up and stain with desired color of stain, adding a second coat of stain if needed
- Brush on polyurethane finish with a brush, following manufacturer's instructions. Three or more coats may be required


Km says
What stain color did you use? It looks really nice.
Km says
Nevermind- sorry- just saw link.