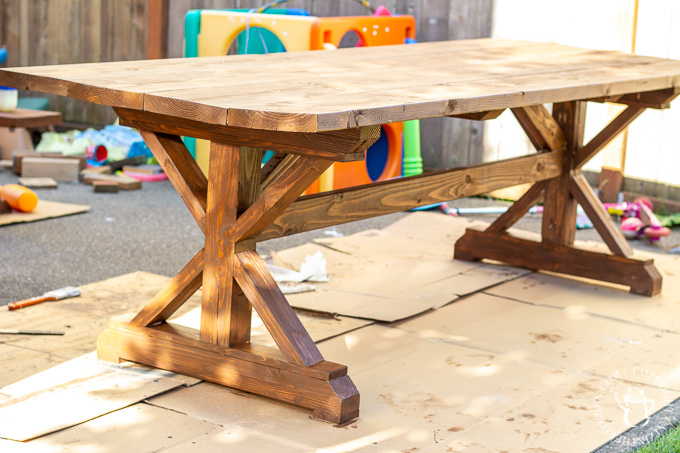
After seeing the farmhouse tables outside in Waco, we decided to try building our own Magnolia Silos Outdoor Table. It's a pretty simple DIY project!

Last year, about five months before Ruby was born, Chels and I took off for a little "baby moon". We ended up making our way down to Waco for a quick trip to the Magnolia Silos - which we would recommend to any fans of Chip & Jo, HGTV, farmhouse style, or just DIY-ing in general! We had a great time and got lots of ideas to bring home for our own family - one of which was this outdoor farmhouse table. I'd just finished building a back deck for us, and we knew we wanted a rustic table for outdoor dining, games, and just general gathering. When Chels spotted the big white tables outside Magnolia Market, she knew what she wanted. She asked if I could take a picture (below) and build one when we got home...and I agreed to try!
 The good news was that the design of the tables was really simple - simple cuts and basic angles. When we got home, I sketched out the design from a couple of angles, and came up with some preliminary measurements. Chels decided that she wanted a couple of chairs for the head and foot of the table, so once she had those (which she found at Target), I had something to measure against.

The materials list for this one was very basic - it's supposed to be rustic and chunky, so nothing too fancy going on here:
- (1) 8-ft 4x4
- (8) 8-ft 2x4
- (2) 8-ft 1x4
- (4) 8-ft 2x10
This doesn't include the materials for the benches, which I kind of figured out after I had the table built. For the benches, you're really just looking at a few more 2x4's and two more 2x10's. There should be enough of the 4x4 left over, as the sections of that used in the benches are really short.

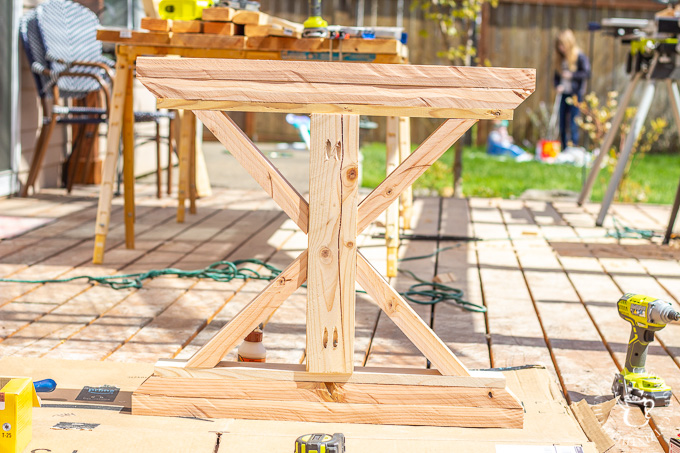
The first thing to make out of this raw pile of lumber is these big beautiful, chunky legs. They are heavy duty, no doubt about it. Which is good, because those four 2x10's for the top are not light. The assembly here is simple. You're stacking 2x4's and topping them with a 1x4, making that again, and then connecting them with a 4x4. The braces are 2x4's, and all of the angles are 45 degrees. I used Gorilla wood glue and deck screws to put together the top and bottom, pocket holes and glue to connect the 4x4, and nails and glue to connect the braces.

There's a finished side and a rough side, typically. I turned all of the best looking sides of my wood (including one of the big cracks in the 4x4, which I knew Chels would like) to the outside, where they would be seen. The rough side, which is also where I put the pocket holes, would be facing the inside of the table.
Now is probably as good a time as any to mention that I tried a tactic I have not tried before with this table, something I saw on Shanty-2-Chic's site, which involves running 2x4's and other lumber through the table saw to remove the mill's round edge. Essentially, it makes this look less like the typically 2x4 project, and a bit more like a finished piece. It was a lot of extra work with my little table saw, but I liked the result.
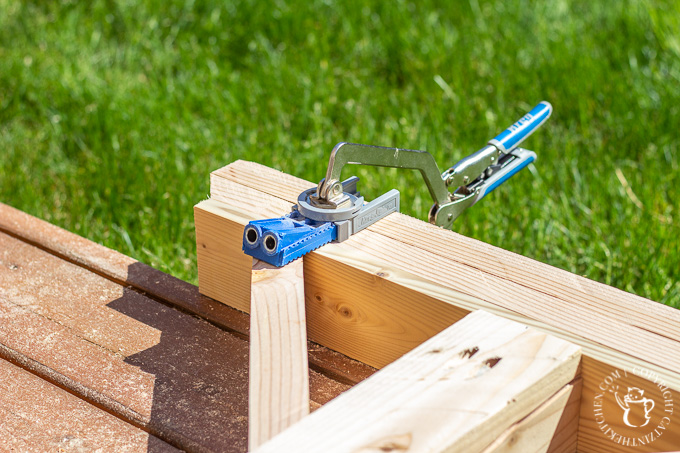
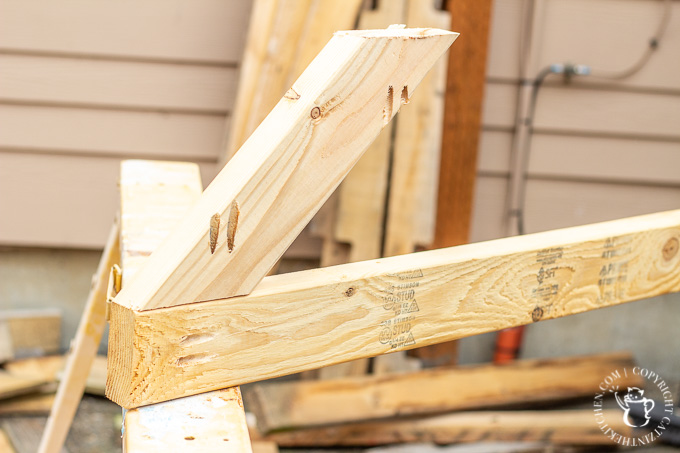
I pre-drilled pocket holes in the "rough side" of my legs, knowing I would need them to attach to the top. I'm still rocking my little Kreg R3. One of these days, I'll shell out the cash for a K4 or K5, but for $39, this thing is hard to beat. I used this little bad boy to build our built-in library, round farmhouse dining table, and our formal farmhouse dining table, too. Suffice to say...I've gotten my money's worth. I also used the Kreg Jig to put a pocket hole in the bottom of my main brace (the 2x4 running the length of the table), which I reinforced with glue and nails from my nail gun.

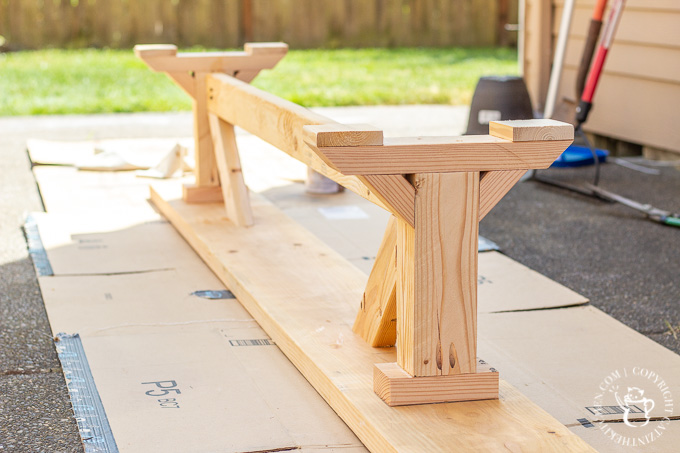
Now, I'll be honest with you - this was a messy way to do this. Setting the legs up, screwing them to the main brace, putting the top on, and then dropping in the angle braces...I don't recommend it. When I built the benches, I did it differently, building the full brace (full-length and angled) separately, connecting the legs to the top, and then dropping in the completed brace. If I were to do this again, I would have done the table the same way. Much cleaner, much easier, much stronger. More on that later.
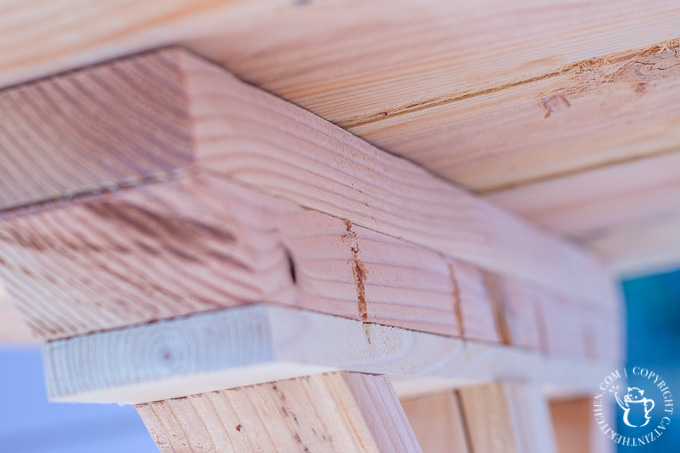
To connect the legs to the top, I used those pocket holes I drilled earlier. It was easy. You know what wasn't as easy? Putting the top together. Unfortunately, I ended up with some warped 2x10's. Thought I had done a good job of eyeing them in the store, but I guess...I didn't. I used clamps, glue, and pocket holes to connect them together, almost exactly like I did for the formal farmhouse dining table top. The wood, however, was thicker, less manipulatable, and more warped. It was tough. Be careful when you're picking out your 2x10's.

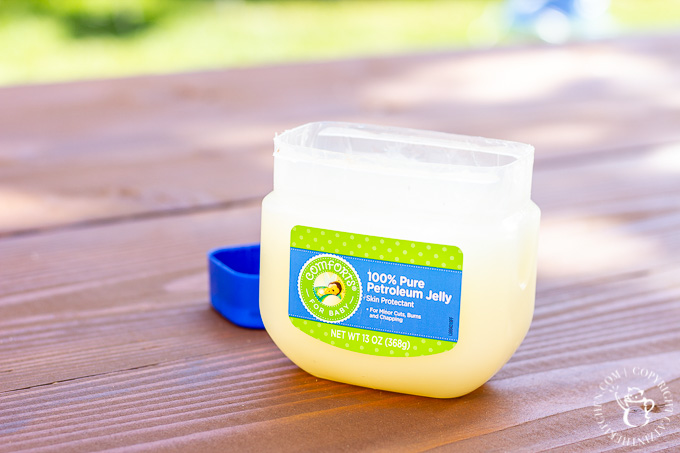
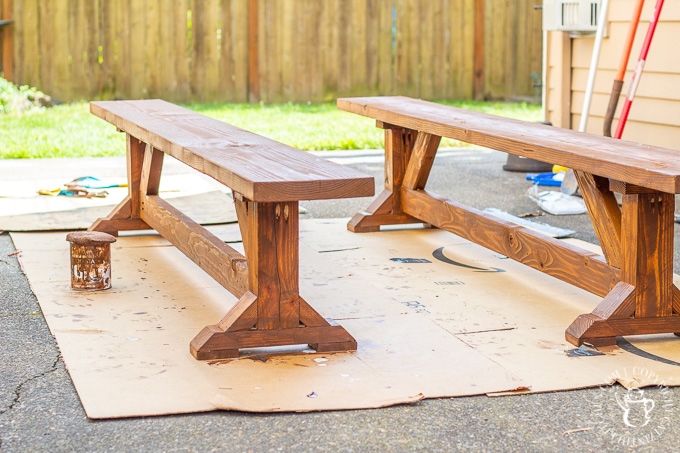
We were going for a very distressed look here, and there's a four step process that we typically use to achieve that. First, we stain it dark, using Varathane's Early American wood stain, which gives the raw pine or fir a rich, deep tone. Next, we rub petroleum jelly all over the corners, edges, and a bit where we want more character across the legs and the top.
Here you can see the table in all it's stained and jellied glory...and, correspondingly, the warped top. I will say that I've come to love this top as we've lived with it. The unevenness doesn't really affect usability, but it gives an even more weathered feel to the surface. Would I have chosen to build it like this? Probably not. Do I mind it? No, I actually like it.
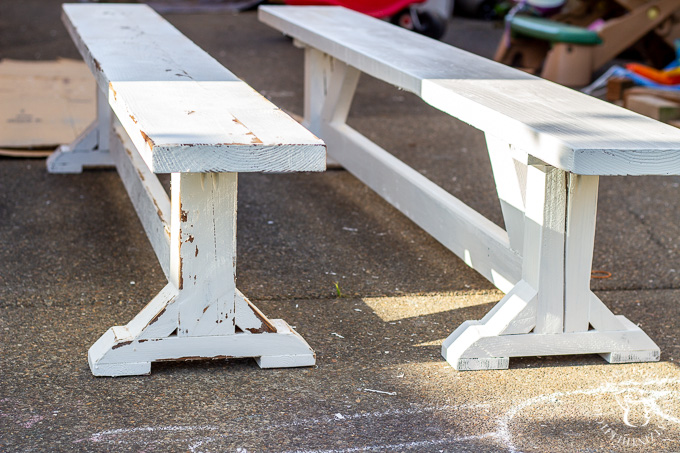
The last two steps in the process? Painting white and sanding. The petroleum jelly keeps the paint from setting up properly in certain spots, allowing the paint to sand off in chips, giving the finish a dramatically rustic, weathered look. More on this as we get into the benches a bit.
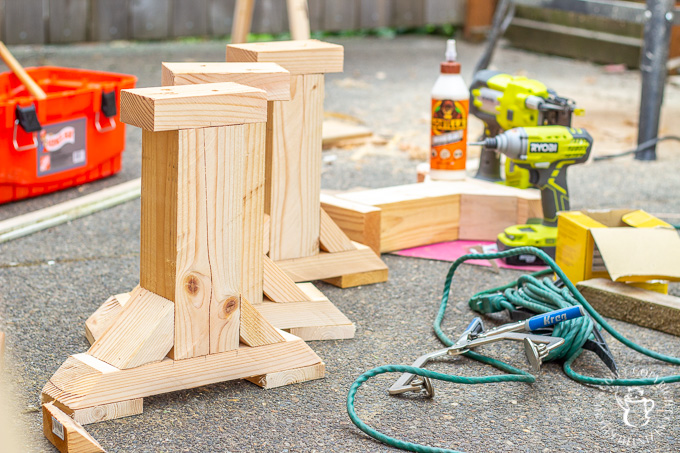
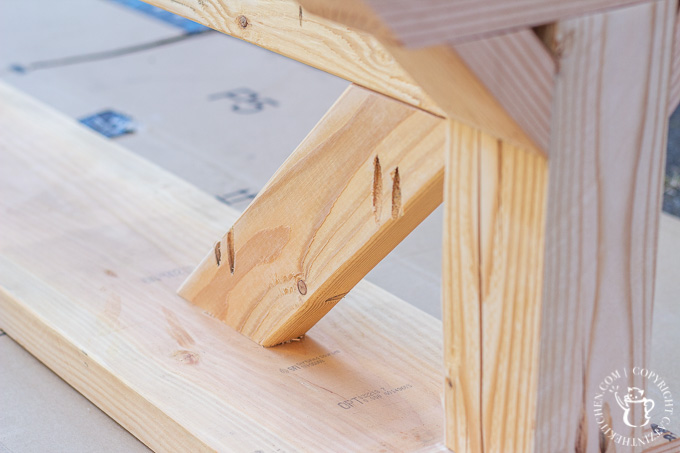
You may or may not actually want benches. Maybe chairs are your jam. For us, with the little ones running around, and the occasional guests joining us, we felt that imitating Magnolia's benches was the way to go. The good news is that they're simple, too. The legs, as you can see, are basically just 4x4's sitting on 2x4's. Again, the tiny braces are 2x4's cut at 45 degree angles.

I mentioned earlier that I changed up my strategy for the big middle braces when it came to the benches, building the whole brace and then dropping it into the completed bench. I used pocket holes (above) to connect the angled brace to the long center brace.
To get the measurements right, I assembled the pieces all dry, no glue, no screws, making sure all of the lengths and angles were correct. Once I had that down, I secured the angled braces to the long braces, and then proceeded to to screw the legs to the bench top using pocket screws and wood glue.

With the legs screwed in place, and brace sitting between them, I dropped a bit of wood glue in where the braces touched the bench top and the legs, and screwed in the pocket screws. Suffice to say, these benches are SOLID.
Once the benches were all put together, it was time to repeat the four step "antiquing" / "distressing" process. First came the stain and the jelly...
Then the paint and the sanding. On the right, you can see the bench before sanding, and on the left, after sanding. You can see how the jelly gives you a random, natural-looking distressing.
And that's it! Well, mostly. We decided to add a few coats of sealant to protect the table and benches, even though they were going to be covered. This is Oregon, and it's...wet. Like, really wet. I would say the results were a little mixed. The sealant mellowed out the bright white of the paint, which was probably good, but it also caused some bubbling in the paint here and there. Nothing that was a dealbreaker, but I would recommend proceeding with caution when choosing and applying your sealant.
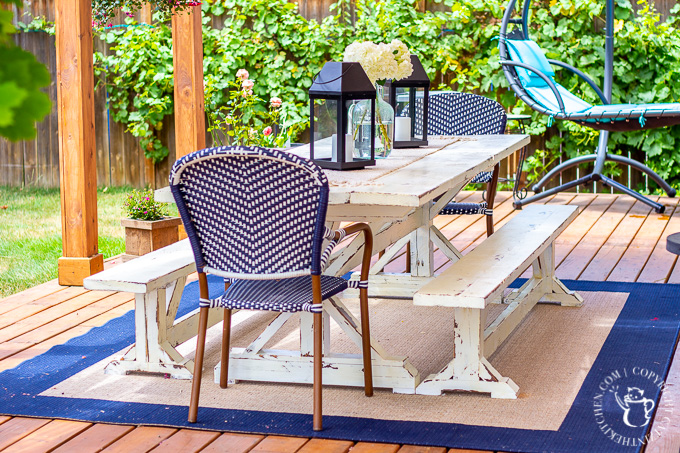
And that's it! We've been using this table all summer, and it's held up great! We've definitely eaten outside more this season than we ever have before, and I think that's due in large part to having this great big, solid space on which to do so.
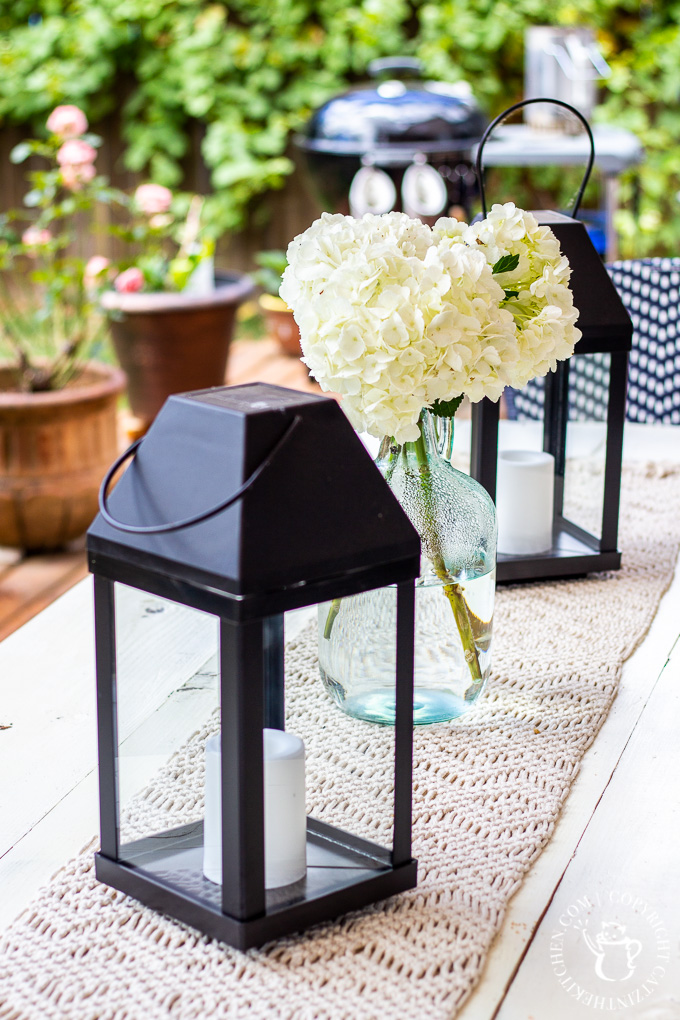
Chels finished everything off with some solar-powered LED lanterns (these are similar - the exact ones we bought are no longer available) and flowers, the aforementioned chairs, a color-coordinated outdoor rug, and a macramé runner. I like the way we finished this, in a distressed white, but you could just as easily leave it the natural pine or fir and shellac it for a cabin feel, or just stain it for a bit more barn-ish look. Is that a thing? Barn-ish? It must be, right?
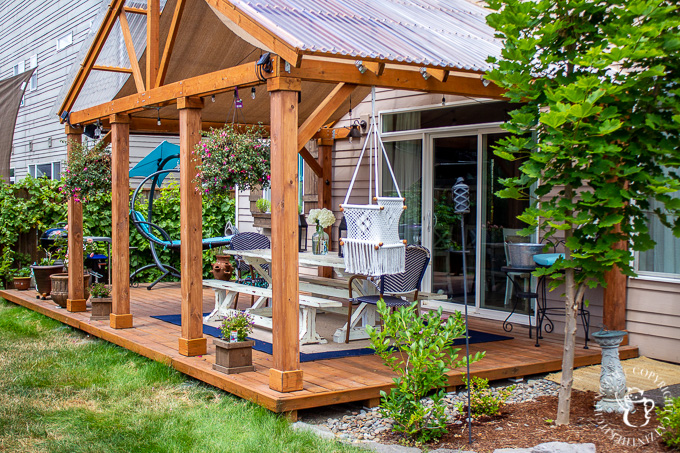
I really am planning to blog the building of the back deck, too! I just need to get around to it. It's a process! We have used this space so much this year, and even more now that we have a big, eight-foot table out there! As I always say, I am an absolute amateur here, and I'd welcome your feedback, questions, and tips in the comments. Hopefully, my learnings and mistakes here will be of benefit if you decide to try something like this yourself!


Tim Hughes says
How long did you make your middle support? I’m looking to have a 72inch table and wanted to see how far I should go. Also which size screws did you use? How high did you end up making the benches? Any way to send a clear picture of the sketch?
Joshua Rief says
Hi, Tim - my middle support is 66 in. long, but that's for a 96 in. table. I left a foot overhang on each end, and then you have to sub out the widths of the legs (7 in. total). So, guessing yours might be closer to 4 ft. long? As to the screws, I used a few different sizes. For the pocket holes, mostly 2 in. screws, as I recall. Is that what you were asking for? Let me see if I can get a better scan of the sketch to you via email. Good luck!
Pallets Hub says
nice making
Sean Smith says
This is fantastic. I've been looking to add a picnic table to my backyard but wanted something a little nicer and this would be a perfect fit. Also fits perfect with my ranch/rustic style i have throughout my house. I do have one question for you though. I'm a novice when it comes to woodworking and need a little more instruction or detail when it comes to cuts and lengths. Anyway you could shoot me an email with some more specific dimensions? I'm planning an 8' table as well so that should make things easy to replicate. Thanks!
Joshua Rief says
Hi, Sean - just sent an email back. Thank you for your encouraging words, and I hope we can get you what you need!
Steve Manning says
Hey Josh, thanks for the great guidance on a very cool chunky table. My son-in-law and I are building a couple outdoor tables and I love what you did. If you wouldn't mind, quick question about the bench...what is the width of the base you built?
BTW, tI agree with your shout out to the Kreg jig. It's one of the greatest additions to anyone's workshop.
Thanks Josh! keep up the great blog!
Joshua Rief says
Hi, Steve - thanks for the encouraging words! Much appreciated! The base for benches is six feet wide (including the legs, which are 4x4's). So the 2x4 brace in the middle is about 66 inches. I figured I wanted an overhang of about a foot on each side. Hope that helps! Please let me know if you have any other questions.
Steve Manning says
Thanks Josh.
How about the width of the bench foot? It looks like its roughly 16'-18'?
Steve
Joshua Rief says
Had to run out and measure for that one. The feet are 14”, and the brace on top of each foot is 6”.
Steve Manning says
Thanks much!
D Davis says
Hello!
We love the build on this table and are trying it in a 10 ft length. Could you please send us the drawings with measurements in an email? Appreciate it so much! Also, Is there a video of this build somewhere that we may have missed?
Thank you so much!
Joshua Rief says
Hi, there! Just emailed you over a scan of the page from my notebook - hope it helps! Sadly, there is no video! I need to get better at taking video of my DIY projects. It's tough, but certainly helpful if you can get it done...Thanks for reading, and good luck with your project!
Janice Lashley says
I’m a beginner at woodworking. I’d love to make this table and benches in a 6’ length. Is it possible for you to send me the measurements for making this set. Thank you, I love your creation!
Joshua Rief says
Hi, Janice! I just have the one sketch that I did in my notebook, but scanned and emailed that to you - hope it helps! Good luck with your project!
Peter Connor says
Could I get a copy of the sketches or measurements if you still have them? I realize this post was a while ago but the table looks perfect. I may just to make it a bit shorter. Thanks!
Joshua Rief says
Hi, Peter! Just sent you the scan that I have of the sketch I did in my notebook - hope it is helpful! Good luck with your project!
John says
So I am VERY late to this party. :) But I see below you made some scans of your dimensions for your table and bench build! Any chance I could get a copy of those too!?
Thanks!
John in Iowa
Joshua Rief says
John, so sorry I didn't see this comment before now! Really behind on some of my responses on these older posts. Thanks for the encouraging words, and would be happy to get you those scans (I don't know how helpful they are, but you are certainly welcome to them). Hopefully not too late!
John says
BTW - GREAT build! Congratulations!