If you've ever thought about turning your cement porch into a wood deck, it's surprisingly easy! Here are some thoughts, tips, & photos from our experience!

One of the "little" projects that's been on my to-do list for quite awhile (there are so many!) is recovering our front porch. Like every other front porch in our housing development (and, come to think of it, every front porch on every house or apartment we've ever lived in), it's made of cement (okay, technically concrete, but whatever...). While a cement porch is obviously rock solid and virtually maintenance free, it's not homey, attractive, or inviting. Chels in particular really is not a fan of the way concrete feels on bare feet, especially the particular kind typically used for this application, which has lots of little pebbles and what-have-you mixed in.
So, for the first two years we lived here, the result was that no one spent any time on our front porch.
In fact, because we didn't spend any time out there, I just assumed the space was really too small to do anything with anyway. When Chels and I started discussing the particulars of what we wanted to do in the backyard, and researching the feasibility of building a wooden deck atop an existing cement patio, the lightbulb went off for her, and she asked me, "Why couldn't you do this on the front porch, too?" So, I went out and measured the porch. As it turned out, it was over 120 sq ft! Plenty of space to hang out, put out a bench and a table, and so on. I decided this "small" project would be a great dry run for the considerably larger (~300 sq ft) back patio I wanted to tackle later in the summer.
I had then checked a lot of different DIY sites for tutorials and ideas, and while it's very unlikely that any particular resource is going to outline exactly the project you are trying to get done, by pulling together ideas from quite a few, I was able to get an idea of the way I wanted to go. Of all the sites I consulted, this article from The Family Handyman was by far the most helpful and comprehensive.

Materials & Cost
I used the following materials for this project:
- (16) pressure-treated 6 ft 2x4's
- (35) kiln-dried Douglas Fir 8 ft 2x6's
- (2) 12 ft 1x2 PVC planks
- (4) pressure-treated 8 ft 2x4's
- 2.5" deck screws
- 3" masonry screws
- 100 ft of flashing tape
- 1 gal waterproofing deck stain
I did purchase a few other things that you may already have lying around - some fresh masonry hammer drill bits, a new stain brush, and some deck wash. And, of course, if you don't already have a hammer drill and an impact driver, you're going to need those (neither is very expensive)! Altogether, this project ran me about $475. I did take one shortcut, and only time will tell if I'll come to regret it! The biggest expense here, of course, is the decking itself. Because my porch is covered, and on the side of the house that gets the least rain and wind exposure, I decided to only go with pressure-treated wood for the sleepers (the foundation, if you will - we'll get to that in a minute) and the trim. For the actual decking surface, I went with kiln-dried fir, which, I'm told, other than cedar and pressure-treated wood, has one of the highest tolerances to weather. And then, of course, I waterproofed it. But, this is Oregon. So we'll see. The boards are installed in such a way that they would be very easy for me to replace one-off if needed, but hopefully it won't come to that, at least not anytime soon. Consider this my own personal experiment...if you want to be totally assured that your deck will last a long, long time, obviously use pressure-treated wood or composite decking. When I do my back patio, which is not covered and takes a beating every winter, I will absolutely have to!
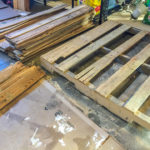
Sleepers

"Sleepers" are, apparently, the name for the beams supporting the deck surface, laid directly atop the concrete. They run perpendicular to the actual deck boards, and elevate the surface slightly, allowing the decking to avoid contact with the ground. Additionally, when the sleepers themselves are elevated slightly with small PVC spacers, as we chose to do, none of the project's wood is in contact with the ground, and any rain or water that might run off or under the deck boards flows right out without sitting under or pooling around any of the wood structure.

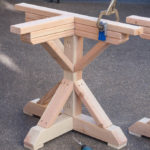
For the PVC spacers, I bought 12-foot pieces of PVC trim, and cut them into 3 ½-inch pieces, three to a sleeper (my sleepers were only six feet long - with a wider porch or patio, you would want to use more, of course. With the spacers under the sleepers, the total thickness of the sleeper is increased to about two inches, and you want your masonry screw to penetrate the concrete by at least an inch. For this application, I used 3 ½-inch long masonry screws, for which I predrilled holes that were about 1 ¾-inch deep.

After securing each sleeper with three masonry screws (one through each spacer), they were pretty rock solid (well, one was a little iffy because of where it was sitting - I borrowed the kids' sidewalk chalk to write a warning message on it - DO NOT STEP!). Our 20-ish foot long porch needed 16 sleepers spaced 16 inches apart.

As a final weather-proofing step, I took Family Handyman's advice and covered each sleeper in flashing tape. You could save around $50 by skipping this step, but as water drains through the slats in your decking, it inevitably ends up...on top of the sleepers. With the flashing tape, the water runs off the deck, onto the flashing tape, and then off onto the cement, while the sleeper itself stays nice and dry. To avoid any water pooling between the decking and the sleepers, this seemed like a worthwhile step to me.
Decking
To me, laying the sleepers was the most challenging part of this project. Drilling into cement and working with masonry screws is a lot harder than working with wood, and once that part was done, the rest seemed easy. The rest, of course, is laying the decking. My 2x6's were eight feet long, so it was mostly just a matter of making sure anywhere a deck board ended was in the center of sleeper. Given that the sleepers are 16 inches apart, center to center, that actually isn't too hard to do with eight-foot boards. You'll end up with some funky recurring measurements, to be sure, especially if, like our porch, you find it's actually a little over 20 feet long, so nothing is quite even. I left about a ¼-inch gap between each row of boards.

I put two deck screws in wherever the deck boards ended on or crossed over a sleeper. I'm sure this goes without saying, but in case there are still any deck screws out there with a phillips head - don't buy them. Get the star drive screws! No stripping, no slipping - so much better. Also, use an impact driver, as I mentioned at the beginning of this post. If you don't have one, buy one - they aren't very expensive, and you'll wonder how you ever lived without one. Believe it or not, the first time I had ever used an impact driver was last year on a Habitat for Humanity build, and I remember just thinking the whole time...I gotta get me one of these... For anyone that's done a lot of decking or roofing, that's probably unimaginable, but for me it was revolutionary, and my little cordless Ryobi impact driver has quickly become one of my favorite tools.

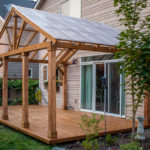
I finished off the deck surface with a trim of 2x4's to cover the ends of the sleepers, and that was it! The deck was in! The remaining steps were all pretty simple, if a bit time-consuming. First, I washed the deck with some wood deck cleaner, just to remove any leftover residue from processing. Next, I masked off my house and pillars and put down a couple of thin coats of waterproofing deck stain (getting that stuff into the cracks between the boards is a PAIN - if anyone knows a good way to do that, please do share!). Finally, I used a couple of pressure-treated 2x4's to create a small trim border around the base of each pillar, giving the whole thing more of a finished look (haven't stained those yet, but I probably will).
Note: There are some great comments from readers at the end of this post about ways to get the strain in-between the boards, from staining the sides ahead of time, to using some nifty purpose-built tools. Good ideas!

Chels prettied the space up with this inexpensive but very smooth and comfortable little porch glider, half a whiskey barrel turned upside down for a table, and some outdoor pillows and silk flowers. It's become a really attractive space, hopefully given us a bit of extra curb appeal, and, most importantly, we hang out there now! Without a doubt, our little front porch has gotten more use in the two or three months since we finished this project than it got in the whole two years we lived here before that!
Here are some more of our DIY projects - check them out!


If you have any questions or comments (or tips!), please comment below and let me know - thank you!


Lauri says
I cringed when I read that you didn’t use pressure treated boards for the decking so now I just have to know how they are holding up. Is the waterproofing doing enough to protect them? The project looks lovely and I hope it holds up for a long time!
Joshua Rief says
Hi, Lauri! I know, as you could tell, I was apprehensive myself! The good news is, we're about a year and half in, and so far, it's still perfect - looks and feels like the day we put it up. I ended up building the bigger deck out back (a post I've been trying to write all summer), and used pressure treated wood for every bit of that one. But, yeah, so far, the little deck out front is doing great! Thank you!
Stella says
As far as code I believe it is illegal to use pressure treated wood as decking/porch boards. If you get a splinter and don't get it out you are getting that chemical into your body.
Joshua Rief says
Hi, Stella - definitely a good point to beware of splinters with pressure-treated wood. With the bit of research I did on our local codes (this project wasn't big enough to require approval), it was actually often required by code to use the pressure-treated lumber! That said, I'm no expert on codes, and they vary widely by locale, of course.
Matt says
If it’s not composite decking, it’s pretty much always treated lumber used in decking...
Charlotte says
I think it would be against code if PT lumber was used for indoor use such as indoor furniture, flooring, etc).
Jodie says
You asked about how to get the sealer down into the spaces?..... It’s easy to pre-seal all your boards before putting them down. That way you can seal all sides, not just the tops. Kudos on a job well done.
Jodie
Joshua Rief says
That's such a good idea! Why didn't I think of that!? Thank you!
Lou says
@Jodie, I don't think you can Stein or seal. Pressure treated for months until it has dried.
Toni says
Great step by step tutorial! I’m going to try this on my covered front patio! I will have to post pics when I’m done!
Thank you for the inspiration!
Toni
Joshua Rief says
Good luck, Toni! Hope it turns out great - would be awesome to see pics!
Carmelita says
Wow you did a great job with every detail along the way, with your instructions i feel like i can tackle this project... Thank you so much.
Carmelita
Joshua Rief says
Thank you, Carmelita! I appreciate that! Good luck to you!
Lisa Kinman says
Very inspiring! I have a concrete front porch for 18 years and have wanted to do just this forever — but I lack the knowledge, and the SHOPPING LIST! Thank you for both! I’m dying to see your back deck, because I have the same dream out there. Thank you Joshua! - Lisa from Burbank, CA
P.S. the strip of links on the side of this page cover the content, making it hard to read your article. Just FYI. :)
Joshua Rief says
Hi, Lisa! I hope you do it! You can actually get a little peek at the back deck at the very bottom of this post we just published about our outdoor table inspired by the Magnolia Silos: http://www.catzinthekitchen.com/2018/10/magnolia-silos-outdoor-table.html. I really need to get the full post up, though!
Thanks for letting me know about the issues with the links. Is it the colorful social sharing links on the left? On my phone and computer they are out of the way (you can make them go away by hovering over the crown and then clicking on the little blue arrows that appear). What browser / device are you using? Would like to troubleshoot that if I can.
Thank you!
dave says
mice and other rodents love the "sleepers on concrete" ide.. to build cozy nests in..
Joshua Rief says
I wouldn't find this hard to believe, although it seems to be true of almost any raised wooden deck. In the case of this one, the trim around the outside limits access, and we haven't had any nesting problems yet in about a year and half (not to say we won't at some point...). Pressure washing periodically helps as well.
Joshua Rief says
Hi, Lisa - just letting you know, the back deck post is finally up! http://www.catzinthekitchen.com/2019/03/diy-turning-a-concrete-slab-into-a-covered-deck.html
Mary Bakey says
Thank you for sharing in such great detail! Sounds like my husband and I will have a new project in our future!
Joshua Rief says
My pleasure, Mary! Thanks for saying so, and good luck if you decide to tackle it!
Kat says
Hmmm my cement front is quite sloped - i guess i would gave to fiddle with the spacers and their height to get the sleepers (and hence decking) level... will have to ponder that one!!!
Looks fab and definately inspired me!!
Joshua Rief says
Hi, Kat! Yes, this is exactly what I had to do for the back deck that I haven't blogged yet (recurring theme in these comments - I need to make some time to get that post up!). Our back cement patio is very sloped for rain run-off, and getting the sleepers to level was the most challenging part of the project, I think. It worked, though! Will try to get that post up soon.
Joshua Rief says
Hi, Kat - that post on the back deck (including leveling the sleepers) is finally up! http://www.catzinthekitchen.com/2019/03/diy-turning-a-concrete-slab-into-a-covered-deck.html
Jake says
I did something similar about 5 years ago. My house has a carport on the east side. I screened it in 8 years ago. The concrete was painted and moisture from condensation was constantly lifting the paint making an ugly and unsafe surface when it got wet.
I considered covering the concrete with concrete pavers, however pressure treated wooden decking has a warmer feel, better look, and it was cheaper in the long run. My cost was somewhere around $700 and a weekend of labor, well worth it !
I also used 1 inch styrofoam insulation between the stringers to reduce the condensation on the concrete.
Joshua Rief says
Sounds like a good project! Definitely have to agree - I know wood can be a fair amount of work to keep up (compared to cement), but it is so much warmer and inviting.
Tes Smith says
Do you have any problems with critters living under the wood. Our screened-in pouch has a terrible condensation issue. Current "weather proof" paint bubbling up. Would this moisture problem be trouble with the sleepers? Very interested.....
Thanks for you advice!
Christine says
Came in via Pinterest. :) This was timely for me, because I want to do the same thing, plus extending my porch out about 4'. I really like how it came out for you!
You asked if someone knew a better way to stain, and I can tell you I used this on another project: https://www.amazon.com/dp/B00M3MGM28/?coliid=I3G7335KJNKTUU&colid=34IBH2VLOSB0H&psc=0&ref_=lv_ov_lig_dp_it Not affiliated at all, just sharing a life-changing tool. Ok, not life changing, but it sure made life easier!
Thanks for sharing your project.
Joshua Rief says
Wow - just added this to my Amazon wish list! The gap wheel is brilliant! Thanks so much for sharing.
Deb says
@Christine, Did you end up extending your front porch? We are thinking of doing the same thing but nervous about how it will look.
Dianne says
The easiest way to get the sides of your decking stained or painted is to lay them all on their side, just like you would if you were stacking them vertically, only you are stacking them horizontally. Stain or paint all the sides, let it dry, then turn them over so the other side is up and stain or paint them and let dry. I used this method when I stained all the boards for my fence, of course, I painted all four sides.. worked pretty well. I had several sawhorses that I put the boards on so it was easier on my back.
Joshua Rief says
Thanks, Diane - this is a great idea, and one I can't believe I didn't think of. I have added a note to the post to read some of these suggestions in the comments!
Kelly says
Looks good, there is a product called deck to wall spacers that could be used that would save time on cutting pvc.They look like circular discs with a hole in the middle or a hock puck ! They were specifically made for helping with preventing water from causing damage!
Joshua Rief says
Just found them on Home Depot's website - didn't even know they existed! Handy! Thanks for the tip. :)
Angeli Macdonald says
Is there a way to do this project by just "floating the deck" on top of the concrete? I do not want to permanantly damage the concrete in case HOA asks me to remove deck material off front porch. What would be the best way to do this without drilling into the concrete?
Joshua Rief says
Hi, Angeli - interesting question. In theory, yes, with some kind of deck block. I built a small floating deck on deck blocks for my parents earlier this year. It’s held up well so far! Do you have much clearance over your concrete patio?
Nicole says
I am also looking to not drill into my porch but I would also like to extend my porch out past our overhang. I had thought I could maybe build a floating deck that had an "overhang" which would then float over the stone porch. Maybe use a board along the front of the house to pin it down? Hoping that would allow me to skip the sleepers? Use the composite decking with PVC spacers for water drainage? Do you think this is a bad idea???
Thank you!
Joshua Rief says
Hmm...interesting situation. So, you're thinking fasten a board along the front of the house that's actually secured to the house itself? I'm thinking composite decking and PVC spacers would be good from a water damage standpoint, but I'm trying to think what the decking would actually be secured to, if not the sleepers and not the porch itself. I'm wondering if you could still use sleepers, secure the PVC spacers to the bottom of them before laying them, and then not secure the sleepers to the porch (so they just rest there). Perhaps the sleepers could be connected to that front board?
Teri Pickering says
I am a 72 year old recently widowed woman, so will not be covering my porch floor any time soon (Ha!), but so enjoyed reading your wonderfully well writren description of your project. I could visualize each step as I read and envy your abilities. Having been accused of being a perfectionist myself I can fully appreciate the planning that went into your project. Thanks for an interesting read - I feel I learned something useful, even though I won't really have an opportunity to use it myself. Good luck in your future projects!
Erin says
OK, this looks awesome! It's definitely something I'd like to look at for our house, as our front porch is covered with awful green, outdoor carpet. As much as we'd love to take that up, we'd be left with the glue on top of the concrete. I think this takes care of both problems.
My question is: how does this work with your step? With the added height of the sleepers and the decking itself, I'm concerned with how that will feel to muscle memory and step height. We have the landing, two steps, then the porch, and I don't know how that will work with the height difference between the porch/1st step and the 1st step/2nd step.
Joshua Rief says
Hi, Erin! Thanks so much for your kind words - I hope the post is helpful! And, yes...that outdoor carpet must go! ;) So, between the sleepers and the decking, you're going to raise the height of your porch by about 3 1/2 inches. I ended up having to build a step for ours, where one wasn't really needed before. Would it be possible to cover the steps as well, to even out the height a bit (understanding that might cause trouble with the bottom step)? What material are the steps?
Erin says
Hmmm.... 3 1/2 inches feels like a lot. The steps are all concrete, leading down to a typical concrete walkway. We'll just play around with it and see what we can come up with. Thinking about another aspect of the porch is our garage- it's attached to the house but the door opens outside to the porch, not the inside of the house. We have 2 steps from the garage up to the porch, so that will be odd as well.
Even if this particular plan doesn't work with what we have, it does give a good starting-out point to come up with something!
Joshua Rief says
Hi, Erin - sorry, I didn't see this comment until today! Yeah, that does sound like it will be more complicated that what I was working with here, for sure. I do hope you can use the general concept to come up with something that works for you!
Kelly Fetch says
@Joshua Rief, great tutorial! I also have green outdoor carpet over concrete front porch. Would I need to remove the carpet or just cover it up? Also, the previous owner put up a sort of half wall around the porch and covered it with siding. I want to demo all of that and do a railing of some type. It would add so much curb appeal and feel like a real front porch.
Joshua Rief says
Hi, Kelly - I would say no need to remove the carpet, with one possible exception: if the material is anything that could potentially rot over time, you wouldn't have anyway to get to it. If it's something that will just lay there and never rot or smell or anything, just build right over it!
Joshua Rief says
Hi, Teri! Thank you so much for your encouraging words! I'm so sorry to hear of your recent loss - it's quite selfless of you to go out of your way to dole out such encouragement at a time when you must be hurting personally. I can't tell you how much I appreciated your comment. I hope you find a DIY project you can tackle! :)